The AI/ML framework in ISAC is a machine learning framework that can be used to power ANY type of recommendation. It is completely configurable, which is why we like to refer to it as the “Platformatization of AI.” While we have 3 different recommendation engines out-of-the box in FSE, Solution Admins can use the same framework to create any recommendation engine imaginable, making it one of the most powerful and unique aspects of the ISAC platform.
Solution Admin set up AI/ML Configurations using the Solution Builder. AI/ML Configuration store all the information needed to roll-out new machine learning engines. Solution Admins can take advantage of any AWS machine learning algorithm, set up the training models, start and retrain the training job, configure endpoints and add features (the factors you want to score like Availability, Schedule, NPS score, First time fix ratio etc). Once setup, an AI/ML Configuration generates an AIML config ID that admins can apply to a Rec Type for use in the Recommendation Center. The 4 current examples for AIML Config in FSE are listed below.
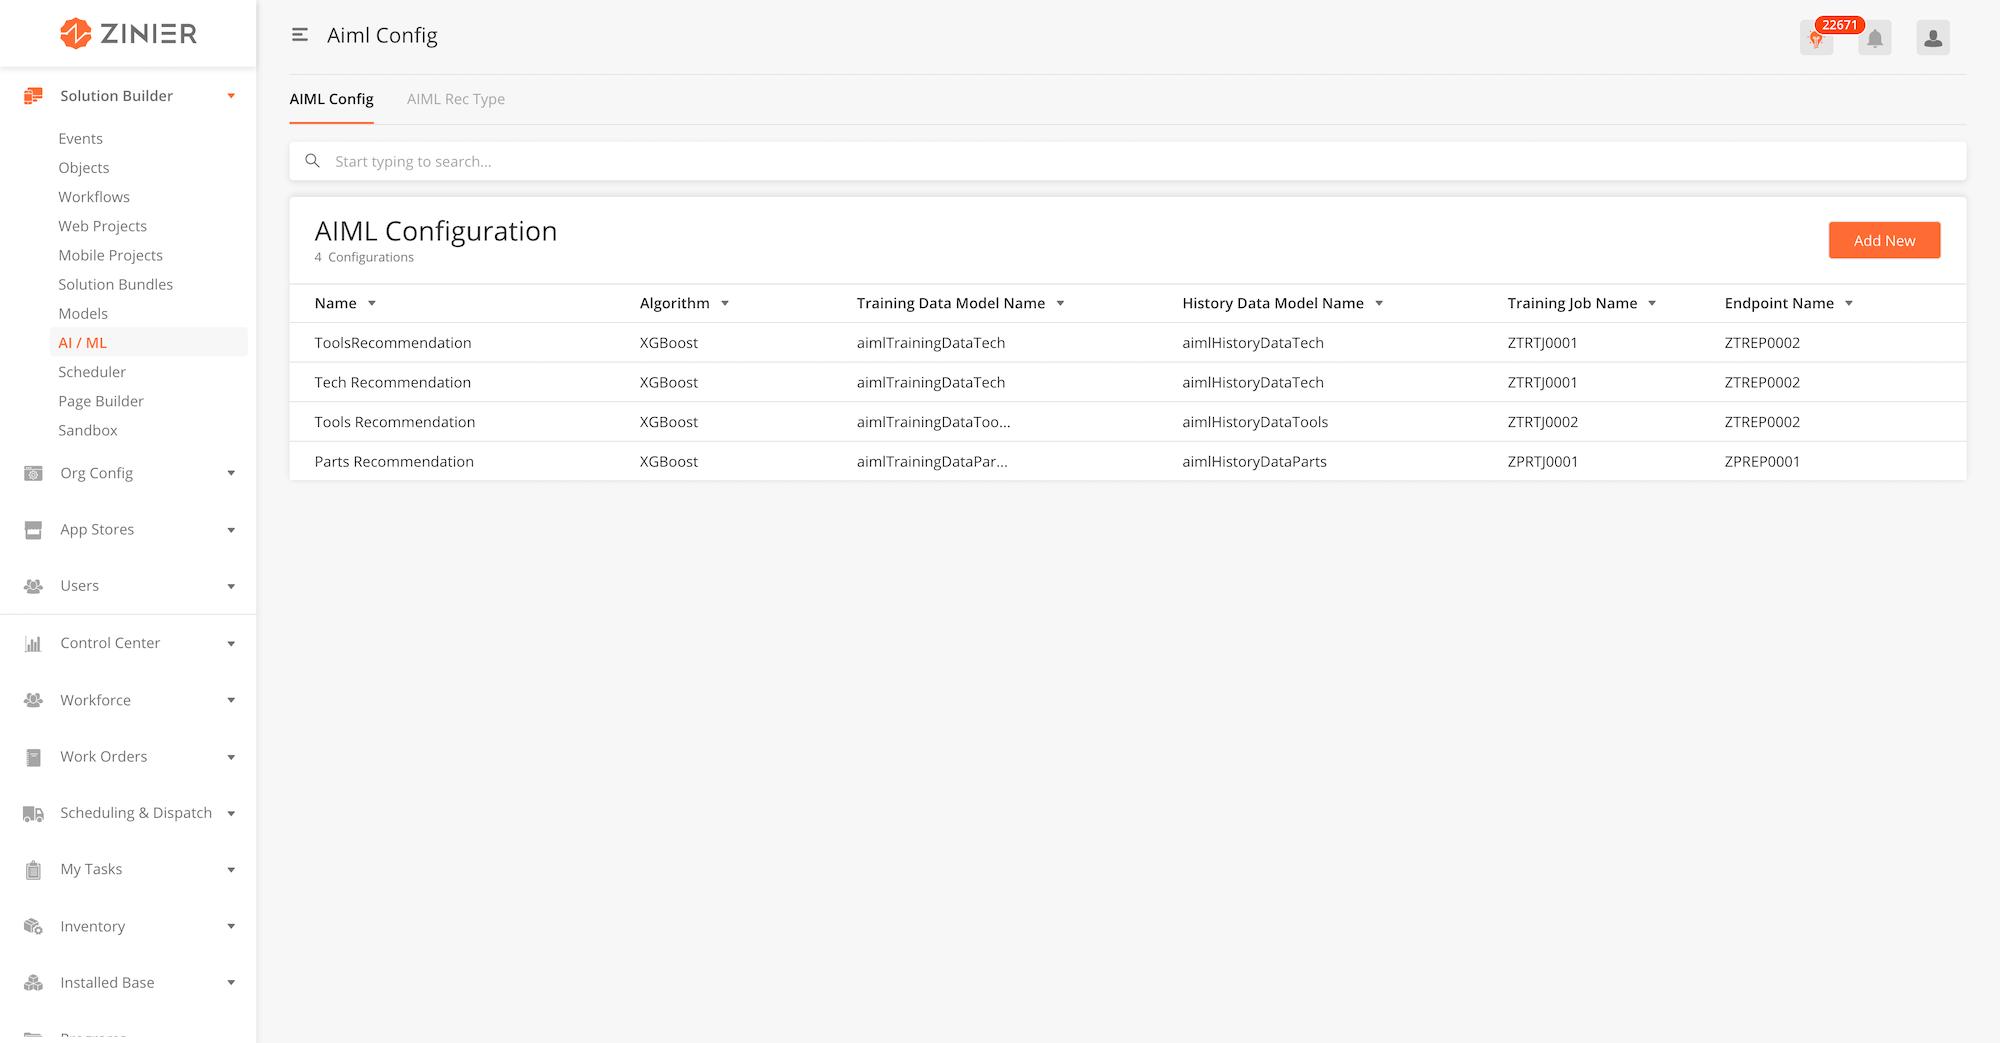
-
From the main page, click Add New to open the side panel.
-
Enter the General Information, Model Configurations, Algorithm Configurations, Control Attributes and import your training data if it exists. A detailed explanation for what each field means is listed in the table below.
-
After filling out all the fields, click Save.
-
Next, you have the option of adding Features to the AIML configuration. To do so, click the Add New button from the Configuration Features table. More details on adding features are listed below.
-
You now have the option of starting the AI training on the dataset. To do so, click the Start Training button from the AI Training Job container.
-
To activate the AIML Configuration, you will need to add an AI endpoint. To do so, click the Create Endpoint button from the AI Endpoint container. Doing so changes the status of the record to "Active."

Fields - AIML Configurations
|
Field Name |
Description |
Example |
|---|---|---|
|
AIML Name |
Give your AIML Config a name. |
Tech Recommendation |
|
AIML Datatype |
The datatype of the AIML config. It can either be a CSV file (most common) or an image if you are creating a AIML based on images (used for image recognition etc.). |
CSV |
|
AIML Model Name |
The name of the trained AI model. |
techRecommendation |
|
Training Data Model Name |
You will have to define 3 models for maintaining and preparing training data. The 1st model is used to store the training dataset. |
aimlTrainingDataTech |
|
History Data Model Name |
The 2nd training model is used to store the historical data of all completed recommendations. |
aimlHistoryDataTech |
|
Feature Cache Data Model Name |
The 3rd training model is the model used to store records of non-contextual features for control attributes defined in AIML config. |
aimlCacheDataTech |
|
Algorithm Name |
The name of the algorithm used to train your AI model. AWS provides default algorithms for various ML use cases. For a detailed list of the types of algorithms, click here. The default algorithm to use for non-image AIML configs is XGBoost. |
XGBoost |
|
Training Job Name |
Enter a name to identify the Training job at the system level. |
ZTRTJ0001 |
|
End Point Name |
Enter a name to identify the endpoint in the system – this is used to retrieve recommendations from the AIML model. |
ZTREP0002 |
|
Result Attribute |
The Result Attribute is the name you you give to a variable used to contain a recommendation score for each set of data returned as a result of running the AIML model. |
totalScore |
|
Max Training Rows |
Determines the maximum size (number of rows/records) of the training dataset. |
1000 |
|
Control Attributes |
A JSON array containing a list of attributes controlling this configuration. |
[ "userId", "taskTypeId" ] |
|
Import Training Data |
Drag and drop a file or click browse to import the dataset you'd like to use to train the AI model. File types can be either .csv, .xls, or .xlsx |
training_data.csv |
|
AI Training Job (Start Training) |
Clicking on the Start Training button will start AIML model training using the dataset file imported from the Import Training Data component. |
|
|
AI Endpoint (Create Endpoint) |
Clicking the Create Endpoint button triggers an API that launches the resources and deploys the model on them. Once the endpoint is active, the status will change to Active. |
AIML Features are what drive the logic behind an AI/ML Configuration. For example, the Tech Recommendation engine contains features such as Proximity Score (a score based on the proximity of a Tech to a task) and Workload (how full is the tech’s overall workload).
These features can be configured and weighted based and new features added based on the business requirements of the organization.
-
From the side panel, click Add New button in the Configuration Features table to bring up the AIML Features side panel.
-
Fill in the fields shown on the right. A detailed explanation for what each field means is listed in the table below.
-
After filling out all the fields, click Save.
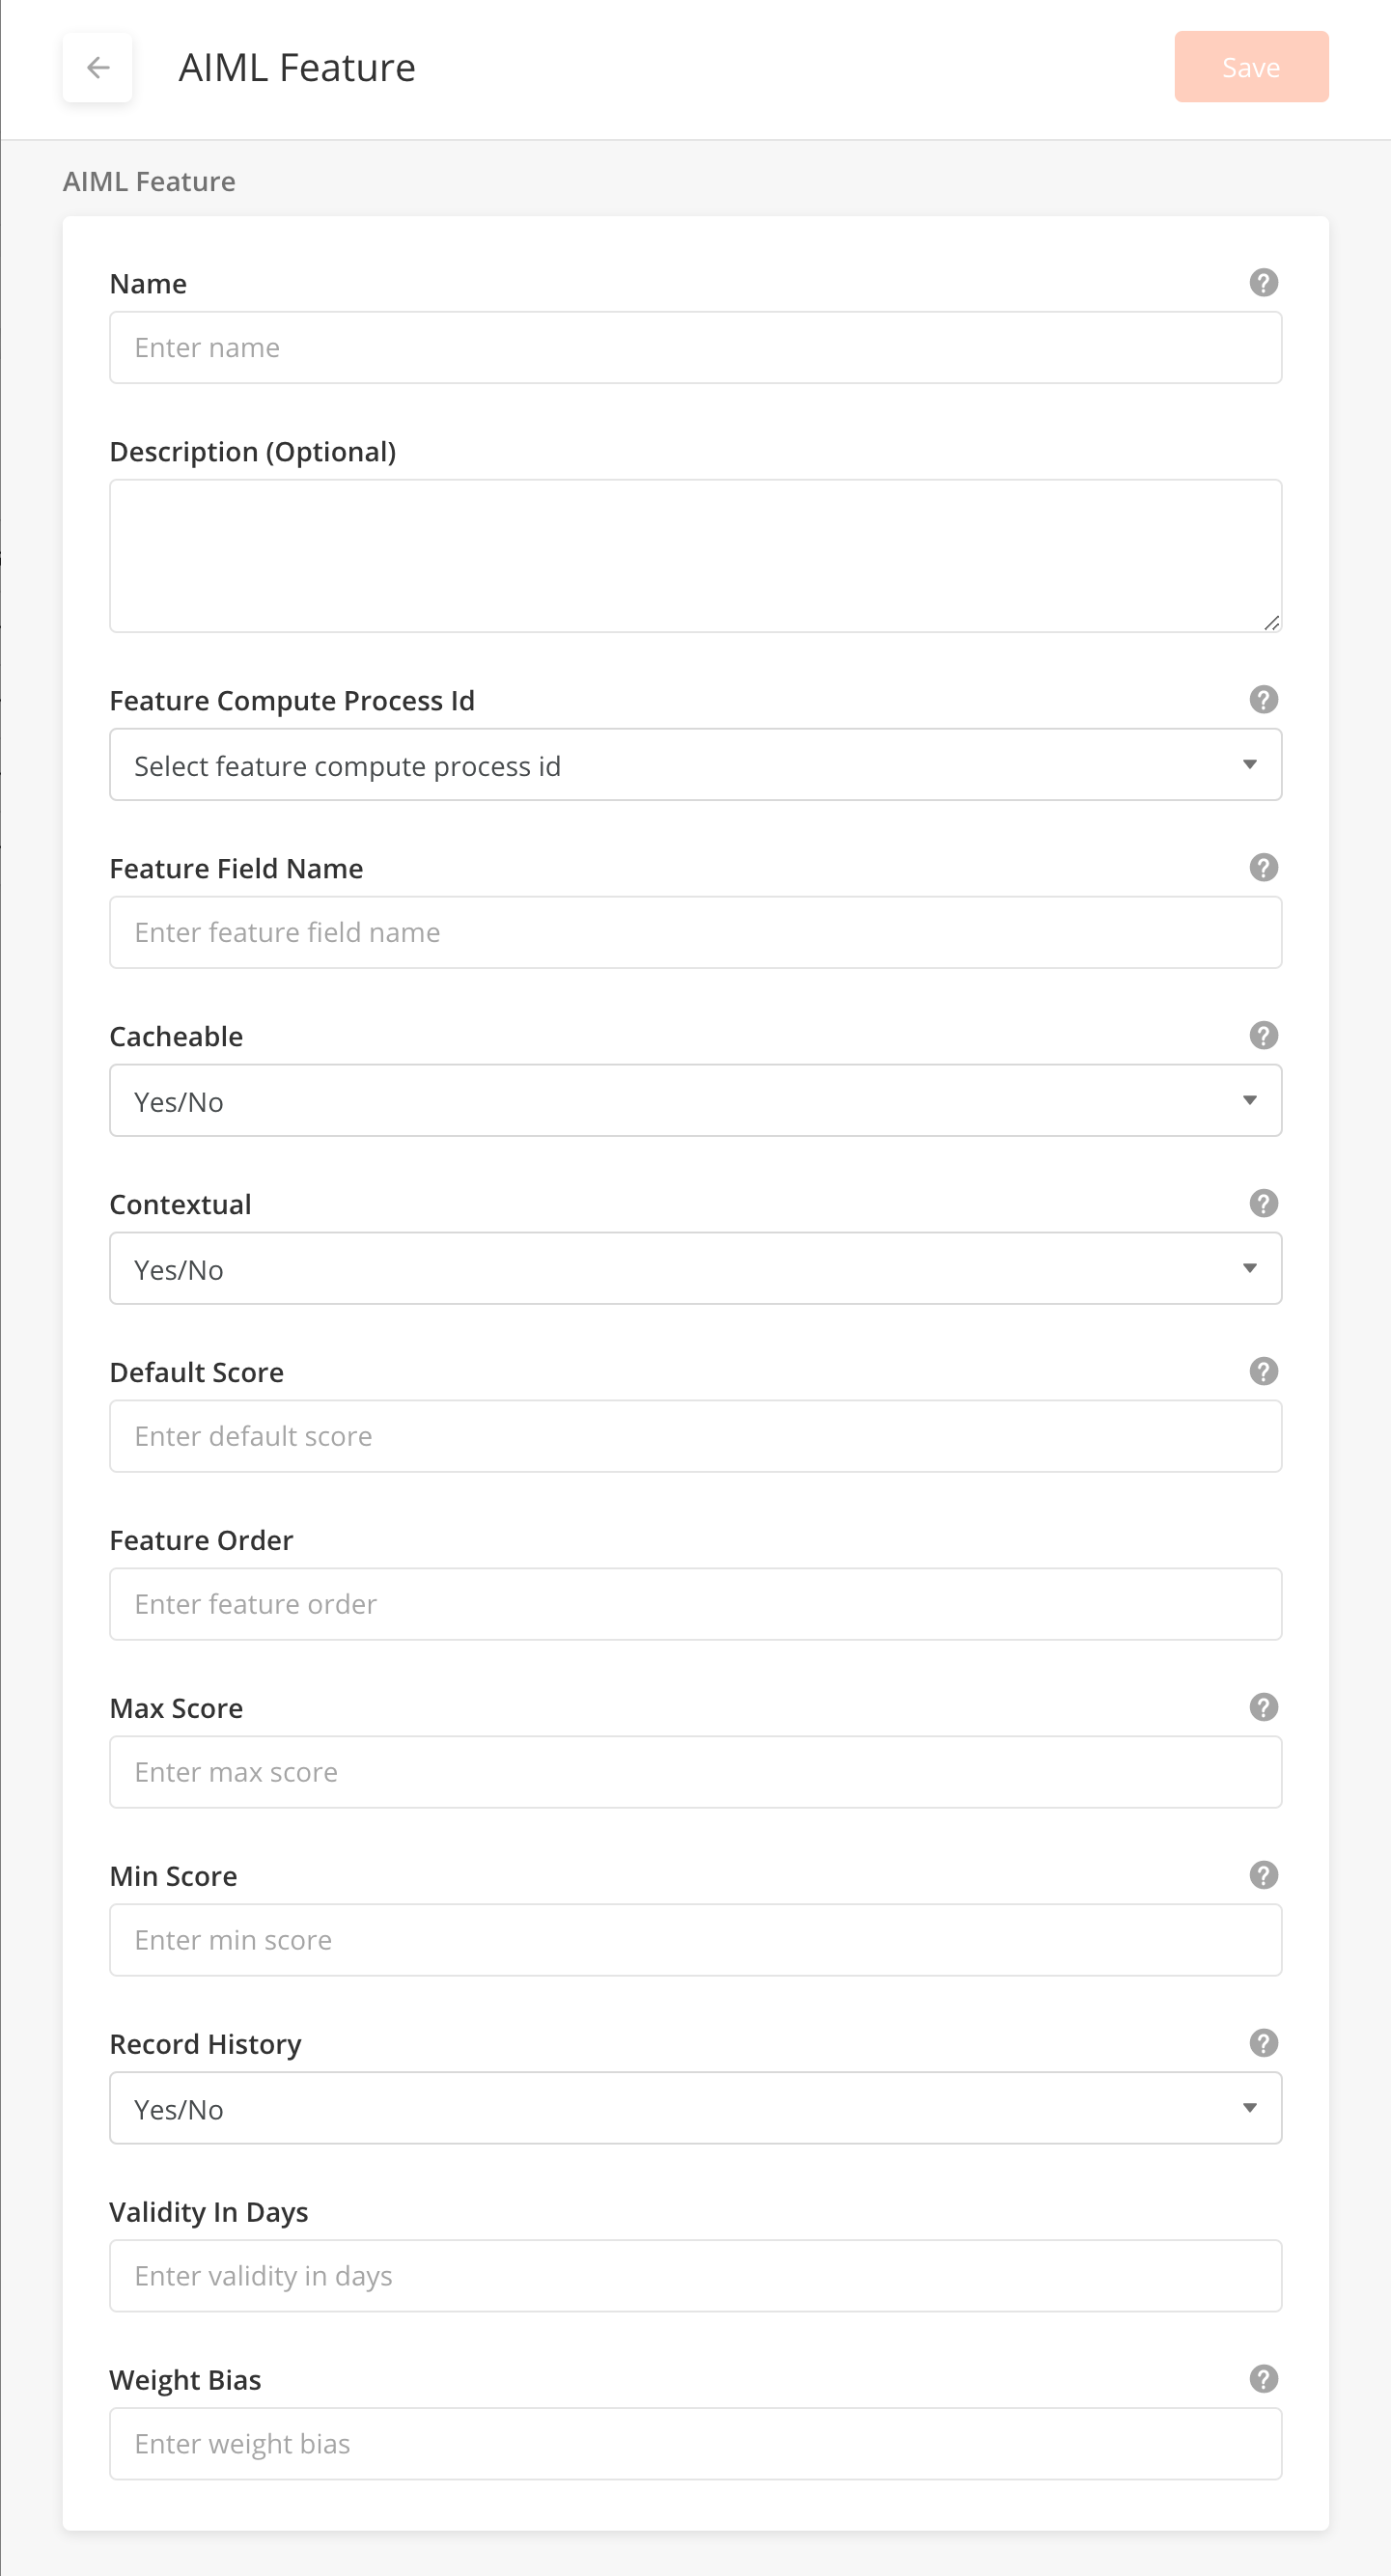
Fields - AIML Features
|
Field Name |
Description |
Example |
|---|---|---|
|
Name |
Give the feature a name. |
Proximity Score |
|
Description |
A description of the feature. This field is optional. |
|
|
Feature Compute Process Id |
Select the workflow you want to use to compute the value of the feature score. |
|
|
Feature Field Name |
The display name used for the feature. |
Proximity Score |
|
Cacheable |
If true, the system will cache the value of this feature. If false, the system will need to calculate this feature at runtime. |
true |
|
Contextual |
If true, the system will need to calculate this feature at runtime. If false, the system will calculate and store this value in the feature cache model for a set of control attributes. |
true |
|
Default Score |
If feature computation does not give a valid output, the default score will be used for this feature's score. |
2 |
|
Feature Order |
This ordering will be applied while transferring the data for model training for a set of control attributes. |
1 |
|
Max Score |
The maximum allowed score for this feature. |
5 |
|
Min Score |
The minimum allowed score for this feature. |
0 |
|
Record History |
If true, the history for this feature will be maintained. |
true |
|
Validity In Days |
Validity in days for this feature. |
365 |
|
Weight Bias |
A multiplier for the feature score to make inputs biased towards this feature. |
Where AIML and the events framework come together, Recommendation Types (Rec Types) are used to configure the recommendations that appear in the Recommendation Center. To set these up, Solution Admins first choose an AIML Config to drive the Rec Type, and then configure which Events to observe, infer and recommend as well as the Workflows that should be triggered when the corresponding events are triggered.
Rec Types can be in one of two forms: actionable Rec Types require that the user either accept or reject the recommendation. Non-actionable Rec Type are suggestions that do not require the recipient to take action.
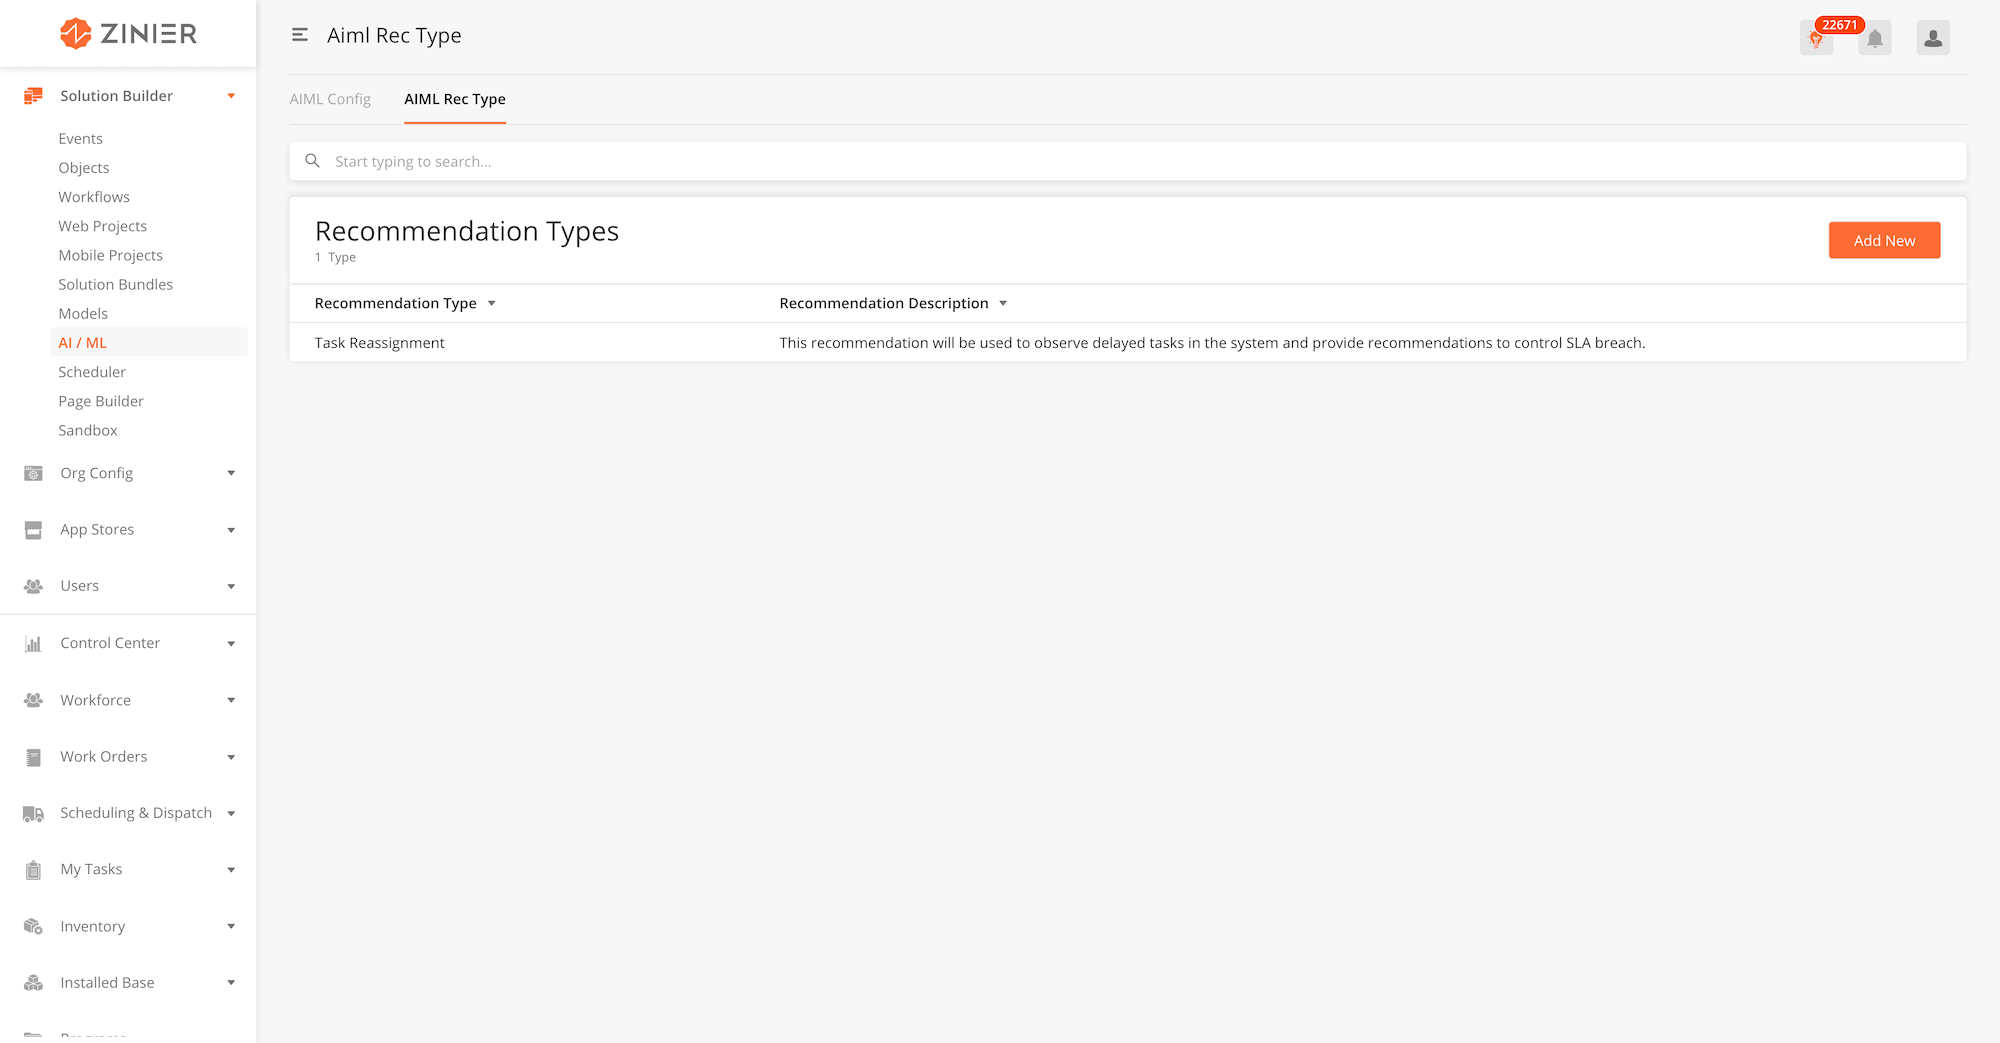
-
From the main page, click Add New to open the side panel.
-
Fill in the fields shown on the right. A detailed explanation for what each field means is listed in the table below.
-
After filling out all the fields, click Save.

|
Field Name |
Description |
Example |
|---|---|---|
|
General Information |
||
|
Recommendation Type Name |
Give your Rec Type a name. |
|
|
Description |
A description of the rec type. This field is optional. |
|
|
AIML Configuration |
Choose the AIML Config that will be used to drive the recommendation. |
|
|
Default Icon Url |
Provide a URL for the icon you wish to use – this icon is displayed as part of the card layout of the recommendation in the Recommendation Center. Typically, we use grey, 20x20 .svg icons. |
|
|
Recommendation Configurations |
||
|
Observation Event ID |
The observation event will be triggered to process collected observations during the task flow. |
|
|
Infer Event ID |
Infer event will be triggered to provide inferences on the outcome of observations. |
|
|
Recommend Event ID |
Recommendation event will provide recommendations on the outcome of observations. |
|
|
Expirable |
If expirable is true, the recommendation will expire automatically after some time. |
|
|
Validity in Minutes |
Validity in minutes will have the duration for the recommendation expiry. |
|
|
Expire Process ID |
If expiry enabled, Expire process will be triggered for the recommendation. |
|
|
Notifiable |
If solution admin wants to notify some users for the recommendation, then enable notifiable and set a notify process id. |
|
|
Notify Process ID |
If solution admin wants to notify some users for the recommendation, then enable notifiable and set a notify process id. |
|
|
Recommendation Controls |
||
|
Actionable |
|
|
|
Accept Process ID |
|
|
|
Reject Process ID |
|
|
|
Allow Add Decision To Training |
To save this decision in training set 'allow add decision to training' to true. |
|
|
Recommendation Access Management |
||
|
Default Priority |
Default priority will have priority for the recommendations of this rec type. |
|
|
Default Status |
Default status will have default status value for the recommendations of this rec type. |
|
|
Target User Group |
Select the user group to which the recommendation should be sent. |
|
|
Supersedable |
If true, newer recommendation will supersede/replace older recommendation that have not been acted upon. |
|
|
Minimum Role Level |
||
|
Auto Acceptable |
If yes, recommendations will automatically be accepted if they are not acted upon by the target user group. |
|
|
Auto Accept Time in Minutes |
If auto Acceptable is set to yes, you can define the time in minutes before the recommendation is auto-accepted. |
|
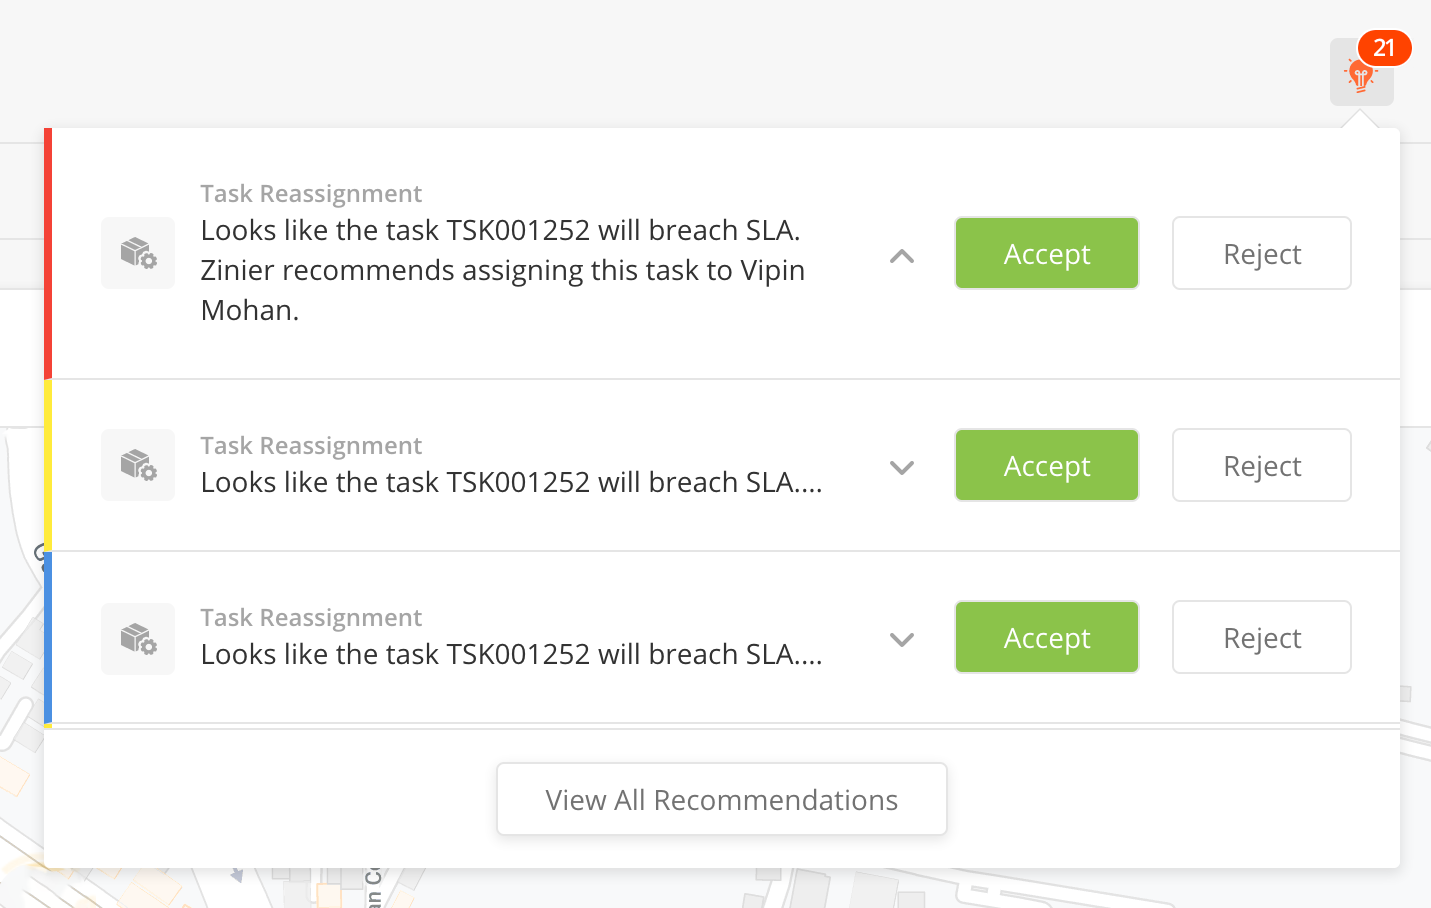
The explanations below indicate how the Rec Type fields in the configuration match the actual output of a recommendation in the Recommendation Center.
Default Priority
Indicated by the colored bar running up the left side of the recommendation. Priorities and colors are configured in the Admin > Business Settings > Priorities module.
Recommendation Type Name
In the example, this is the grey text that reads "Task Reassignment" which appears above the text explaining the recommendation.
Default Icon Url
The URL you use will enable you to set different icons for different recommendations. In the example, because all three recommendation are the same type ("Task Reassignment"), they have the same icons – which is a grey box/gear.
Actionable (YES/NO)
In the example, Actionable is set to Yes. We know this because the user is asked to either accept or reject the recommendation. If Actionable = No, the only button visible will be "Acknowledge".
Tech Recommendation engine that can assist you when scheduling and dispatching tasks. The engine can take in account multiple attributes and skill requirements when assigning a user to a specific type of task and location.
-
Task Skills and User Skill Dependencies: Skills added to a Task Type are Users are used by the Tech Recommendation engine to match a user with the right skills/skill levels to a task that requires certain skills/skill levels.
-
Task Attribute Dependencies: Attributes added to a Task Type are used by the Tech Recommendation engine to match a user to a task. These configurations are set using the following to Modules:
In these modules you can configure:
Below is a list of parameters that can be configurable for a Ai engine used for Tech Recommendation:-
-
Training Job Instance Type: The ML compute instance type used for training. https://aws.amazon.com/sagemaker/pricing/instance-types/
-
Training Job Instance Count: The number of ML compute instances to use while training. For distributed training, provide a value greater than 1.
-
Volume Size In GB: The size of the ML storage volume that you want to provision.
ML storage volumes store model artifacts and incremental states. Training algorithms might also use the ML storage volume for scratch space. If you want to store the training data in the ML storage volume, choose File as the TrainingInputMode in the algorithm specification. You must specify sufficient ML storage for your scenario
-
S3 Bucket Name For Training Job: The S3 bucket to use for fetching the training data and for storing training job intermediate files
-
S3 Prefix Path For Training Job: The S3 path under the bucket where the required data can be found and for storing training job intermediate files
-
Max Runtime In Seconds For Training Job: The maximum length of time, in seconds, that the training job can run. If model training does not complete during this time, Amazon SageMaker ends the job. If the value is not specified, the default value is 1 day. The maximum value is 28 days
-
Enable Inter Container Traffic Encryption: To encrypt all communications between ML compute instances in distributed training, choose True. Encryption provides greater security for distributed training, but training might take longer. How long it takes depends on the amount of communication between compute instances, especially if you use a deep learning algorithm in distributed training
-
RoleArn: The Amazon Resource Name (ARN) of an IAM role that Amazon SageMaker can assume to perform tasks on your behalf.
-
End Point Instance Type: The ML compute instance type used for inference/recommendations. https://aws.amazon.com/sagemaker/pricing/instance-types/
-
End Point Initial Instance Count: Number of instances to launch
-
Algorithm Selected: AWS provides a default algorithm that is used for various ML use cases. The details are available here - https://docs.aws.amazon.com/sagemaker/latest/dg/algos.html
The default algorithms are:-
-
XGBoost Algorithm
-
BlazingText Algorithm
-
DeepAR Forecasting Algorithm
-
Factorization Machines Algorithm
-
Image Classification Algorithm
-
IP Insights Algorithm
-
K-Means Algorithm
-
K-Nearest Neighbors (k-NN) Algorithm
-
Latent Dirichlet Allocation (LDA) Algorithm
-
Linear Learner Algorithm
-
Neural Topic Model (NTM) Algorithm
-
Object2Vec Algorithm
-
Object Detection Algorithm
-
Principal Component Analysis (PCA) Algorithm
-
Random Cut Forest (RCF) Algorithm
-
Semantic Segmentation Algorithm
-
Sequence-to-Sequence Algorithm
-
-
Training Job Name:
-
End Point Name:
-
RetrainEnabled: This parameter will determine whether a training model will be retrained with new data when a training request comes in with an already existing name. If RetrainEnabled is false, then new training request with a already existing model name will be deleted and new model will be created instead of updating the existing model
-
Lambda API Time Out: The time out value in seconds before a lambda function that calls the Sagemaker API's timesout
-
NonContributingAttributes: During training and get recommendation, we might pass certain attributes like user name, user ID etc which should be ignored by the Ai engine as they don't impact the results. These attributes are used to identify the result of Ai engine
Overview
XXX
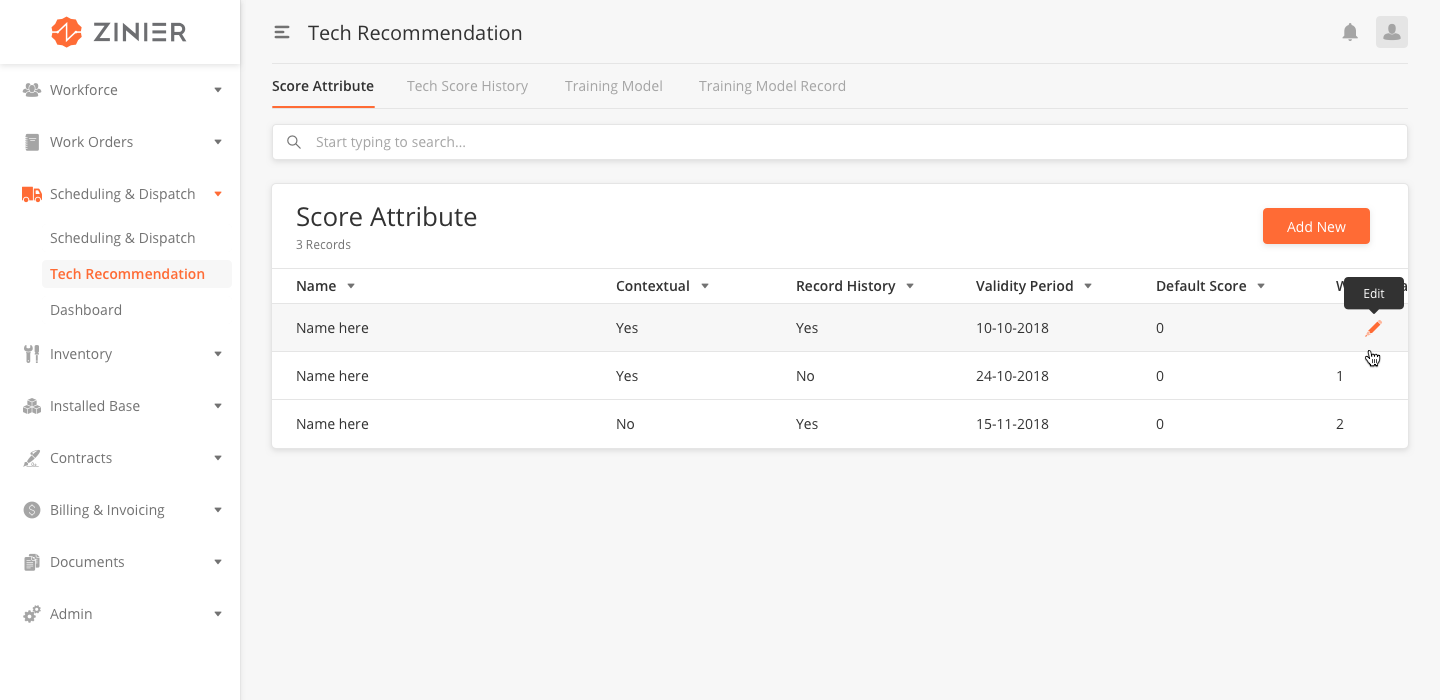
Add New Score Attribute
-
From the main page, click Add New to open the side panel.
-
Enter the Name and Description of the score attribute.
-
Select yes or no to indicate if the attribute is Contextual. When selecting yes....
-
Select yes or no to indicate if the attribute should Record History. When selecting yes history will be recorded.
-
Indicate the Validity Period by entering the end date.
-
Enter the Default Score.
-
Enter the Weight Bias.
-
Click Save.
Edit or Delete Score Attributes
You can edit or delete a Score Attribute by hovering over the row of the desired record from the main page table and click the Edit icon. When you click Edit, the side panel will appear. Edit the information and click Save, or click the trash bin icon on the top navigation to delete the record.
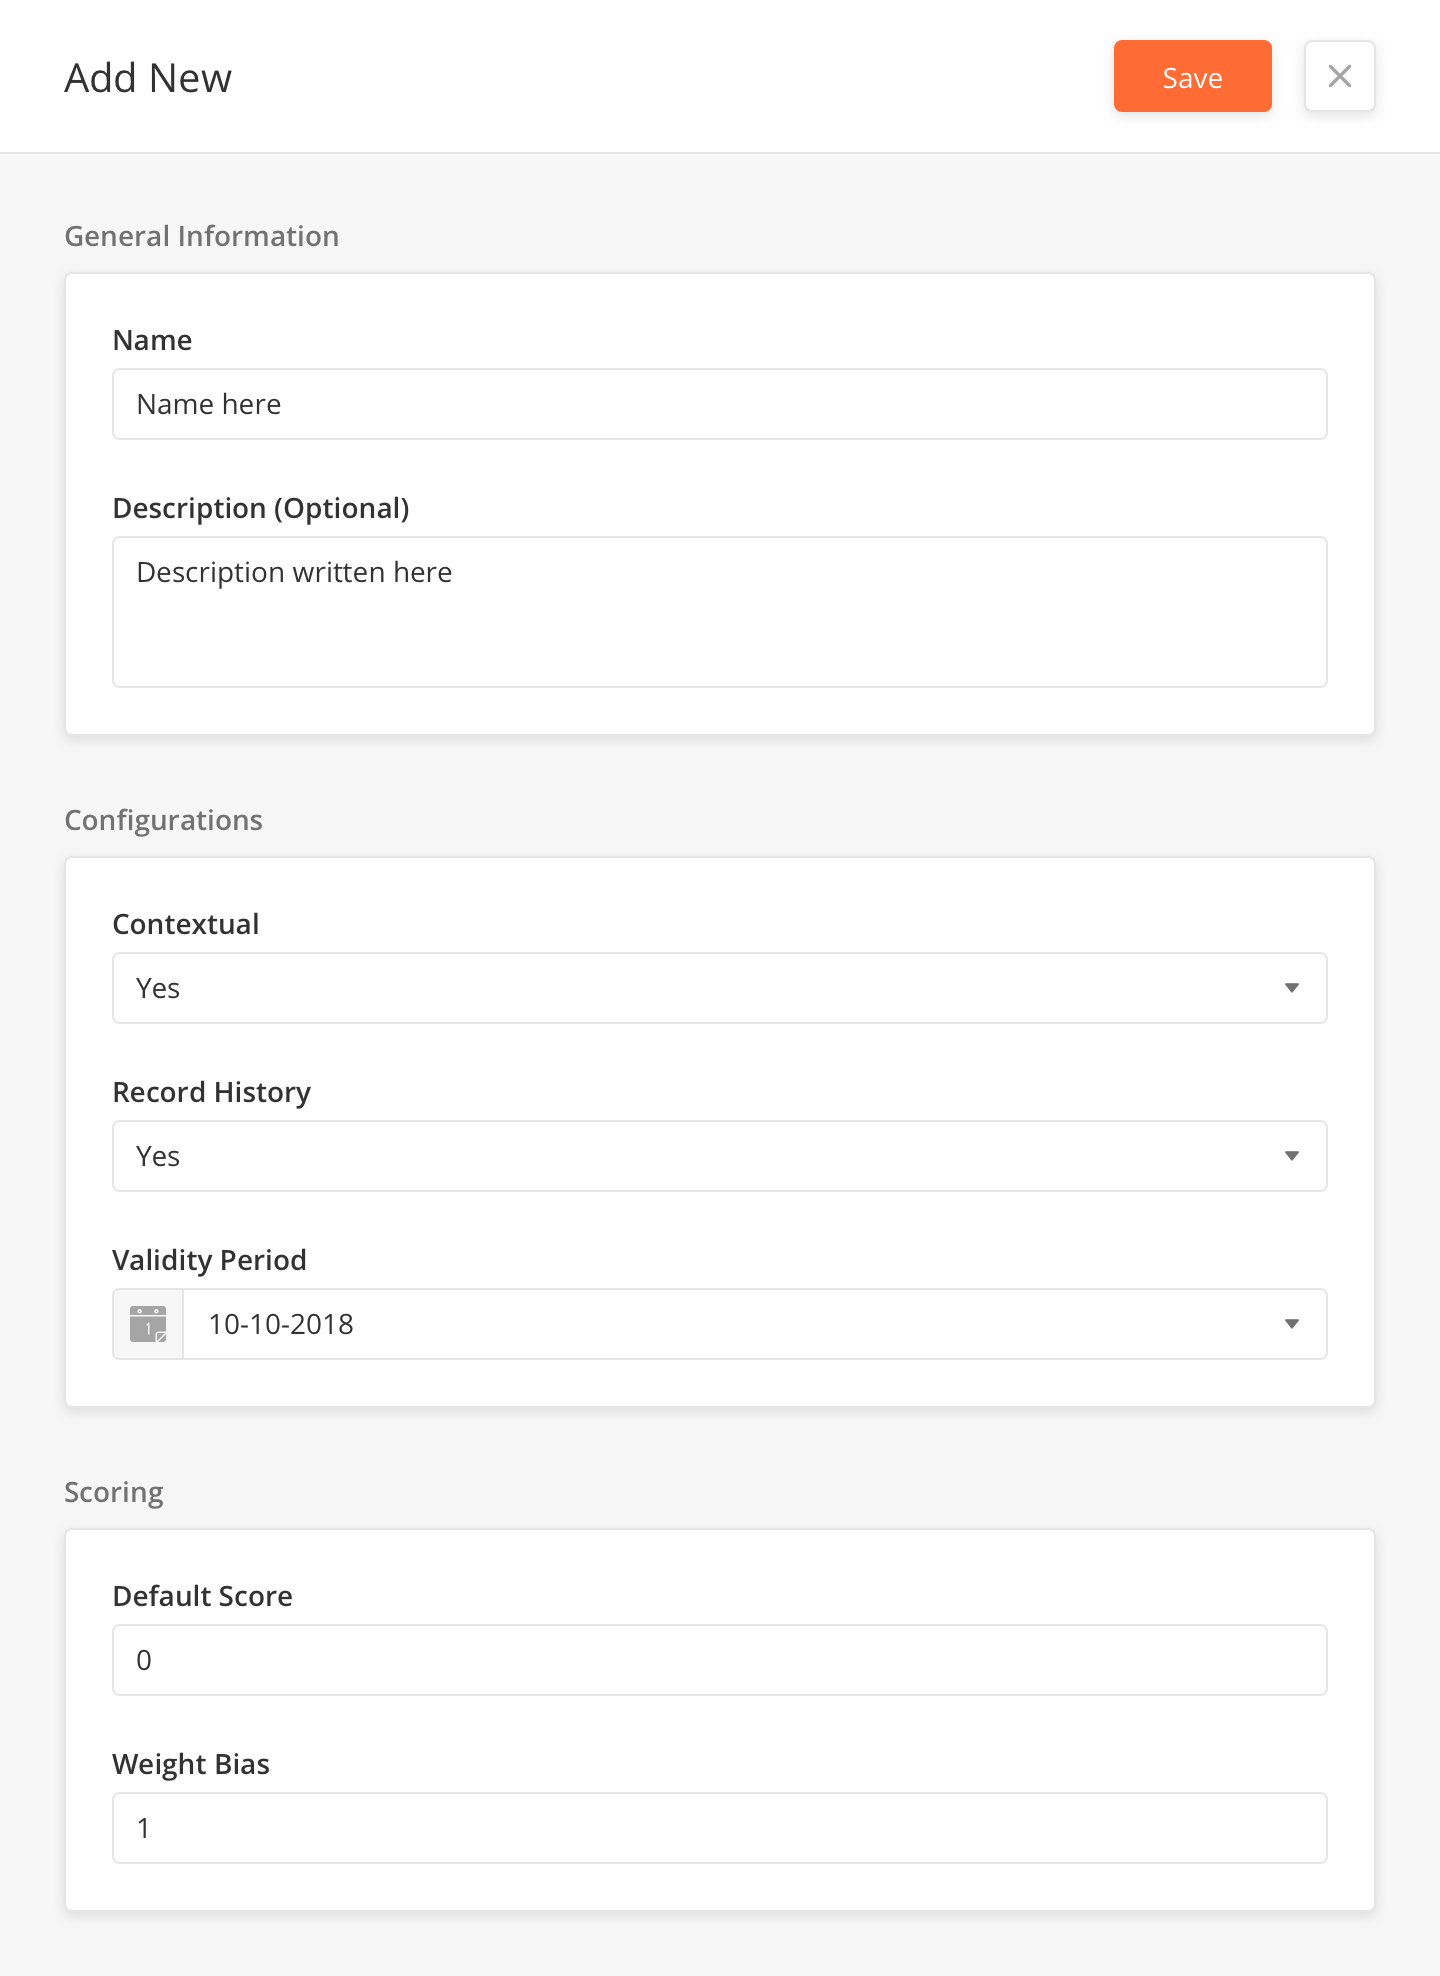
Score Attribute Fields
|
Field Name |
Description |
Example |
|---|---|---|
|
Name |
Name the score attribute |
?? |
|
Description (Optional) |
Describe the goal of the attribute |
?? |
|
Contextual |
Select if the Attribute is contextual |
Yes |
|
Record History |
Select if the Attribute should store the History |
Yes |
|
Validity Period |
?? |
10-10-2018 |
|
Default Score |
?? |
0 |
|
Weight Bias |
?? |
1 |
Overview
XXX
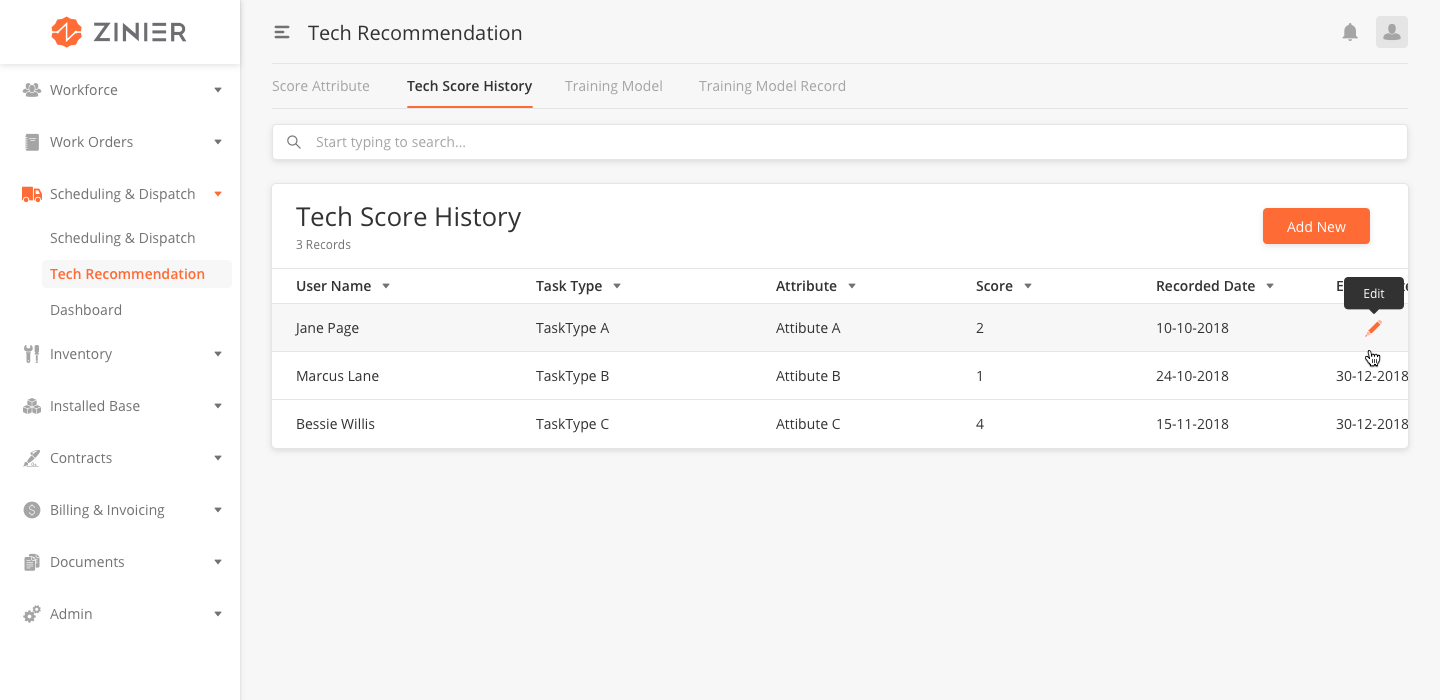
Add New Tech Score History
-
From the main page, click Add New to open the side panel.
-
Enter the Name and Description of the Tech Score History.
-
Select the Task Type.
-
Select the Attribute.
-
Enter the Score
-
Enter the Recorded Date
-
Enter the Expiry Date
-
Click Save.
Edit or Delete Tech Score History Attributes
You can edit or delete a record by hovering over the row of the desired record from the main page table and click the Edit icon. When you click Edit, the side panel will appear. Edit the information and click Save, or click the trash bin icon on the top navigation to delete the record.
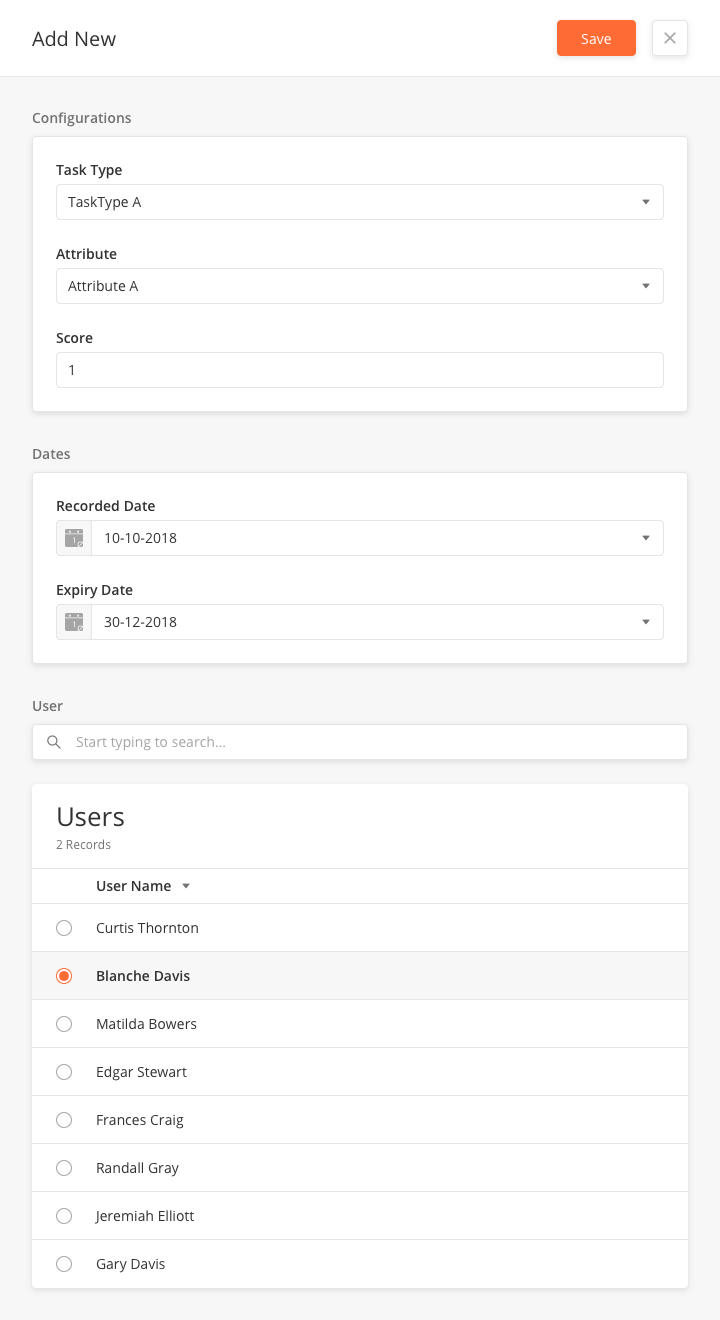
Tech Score History Fields
|
Field Name |
Description |
Example |
|---|---|---|
|
Task Type |
Select the task type for…. ?? |
?? |
|
Attribute |
Select the attribute for… ?? |
?? |
|
Score |
?? |
?? |
|
Recorded Date |
?? |
10-10-2018 |
|
Expiry Date |
?? |
31-12-2018 |
|
Users |
Select a user from the table |
Blanche Davis |
Overview
XXX
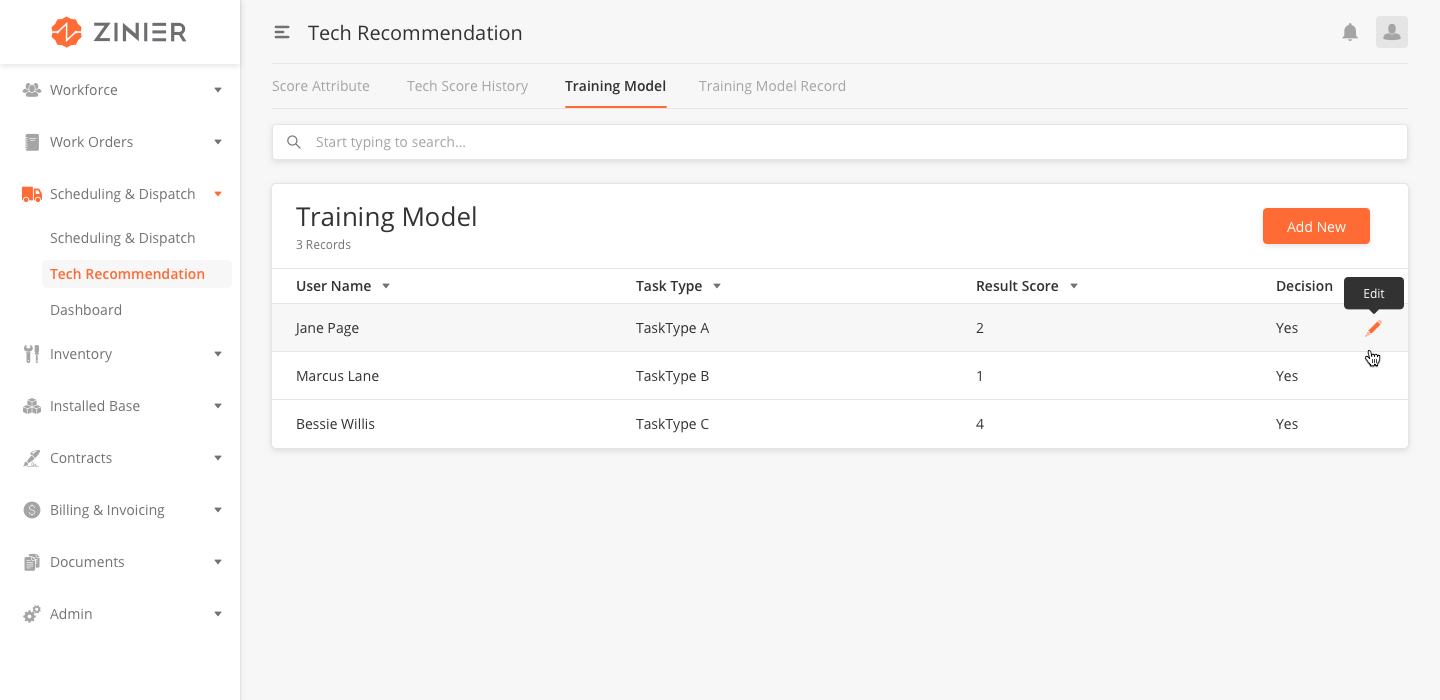
Add a New Training Model
-
From the main page, click Add New to open the side panel.
-
Enter the Name and Description of the Training Model.
-
Select the Task Type.
-
Enter the ResultScore.
-
Select yes or no in the Decision field.
-
Select the Users.
-
Click Save.
Edit or Delete Training Models
You can edit or delete a record by hovering over the row of the desired record from the main page table and click the Edit icon. When you click Edit, the side panel will appear. Edit the information and click Save, or click the trash bin icon on the top navigation to delete the record.
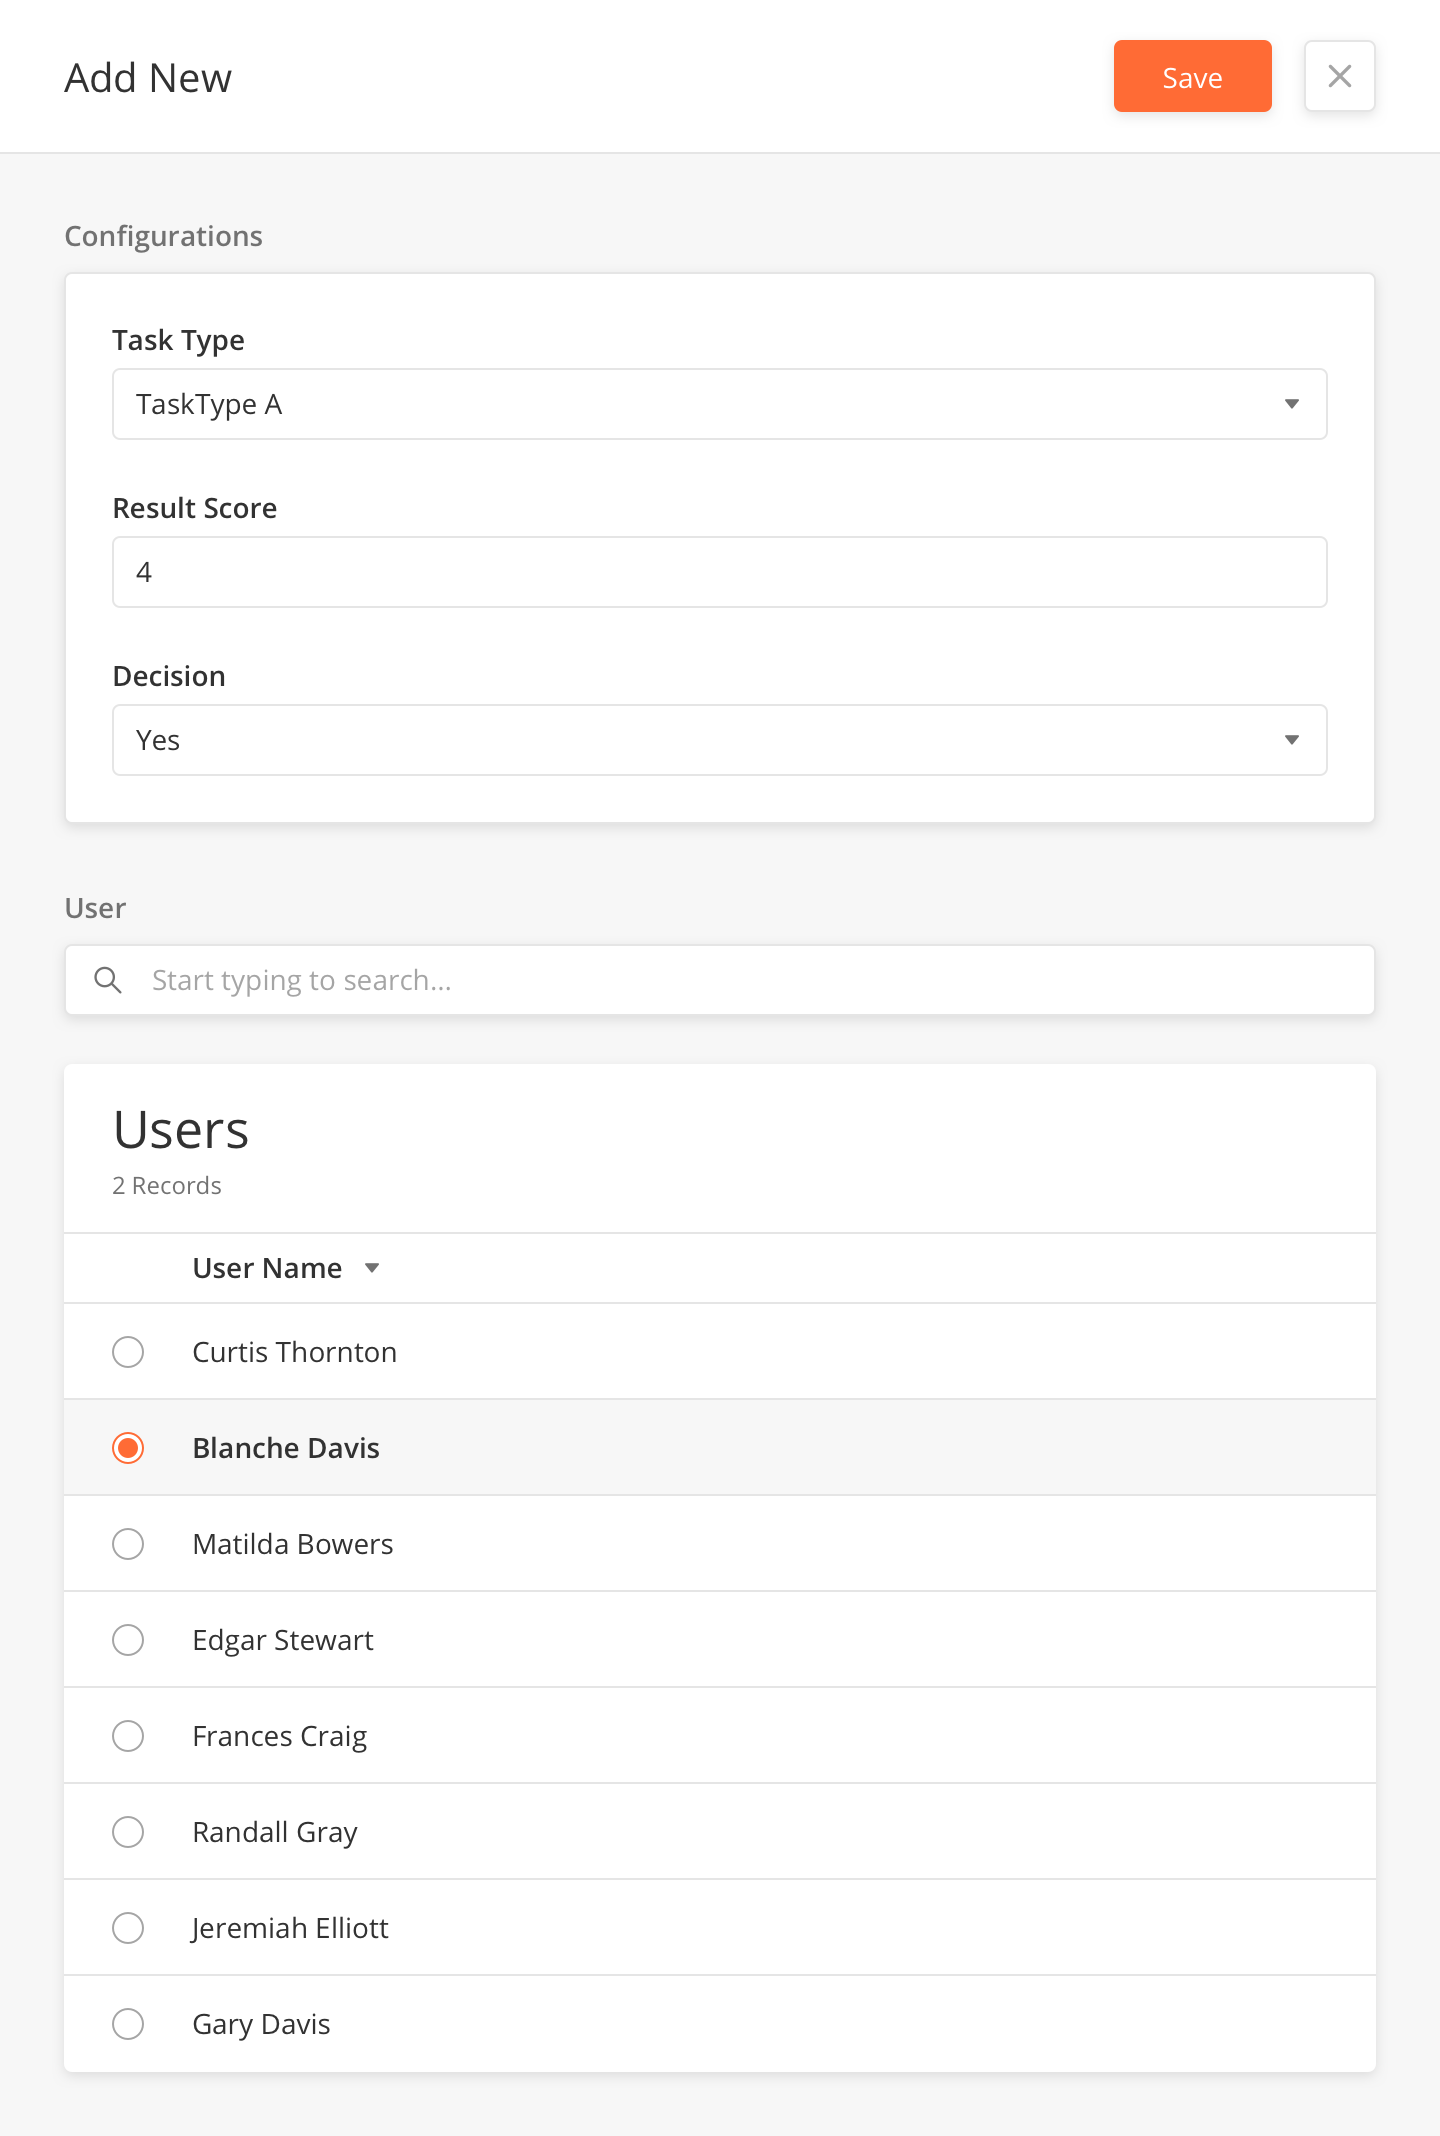
Training Model Fields
|
Field Name |
Description |
Example |
|---|---|---|
|
Task Type |
Select the task type for….?? |
?? |
|
Result Score |
Select the attribute for… ?? |
4 |
|
Decision |
?? |
Yes |
|
Users |
Select a user from the table |
Blanche Davis |
Overview
XXX
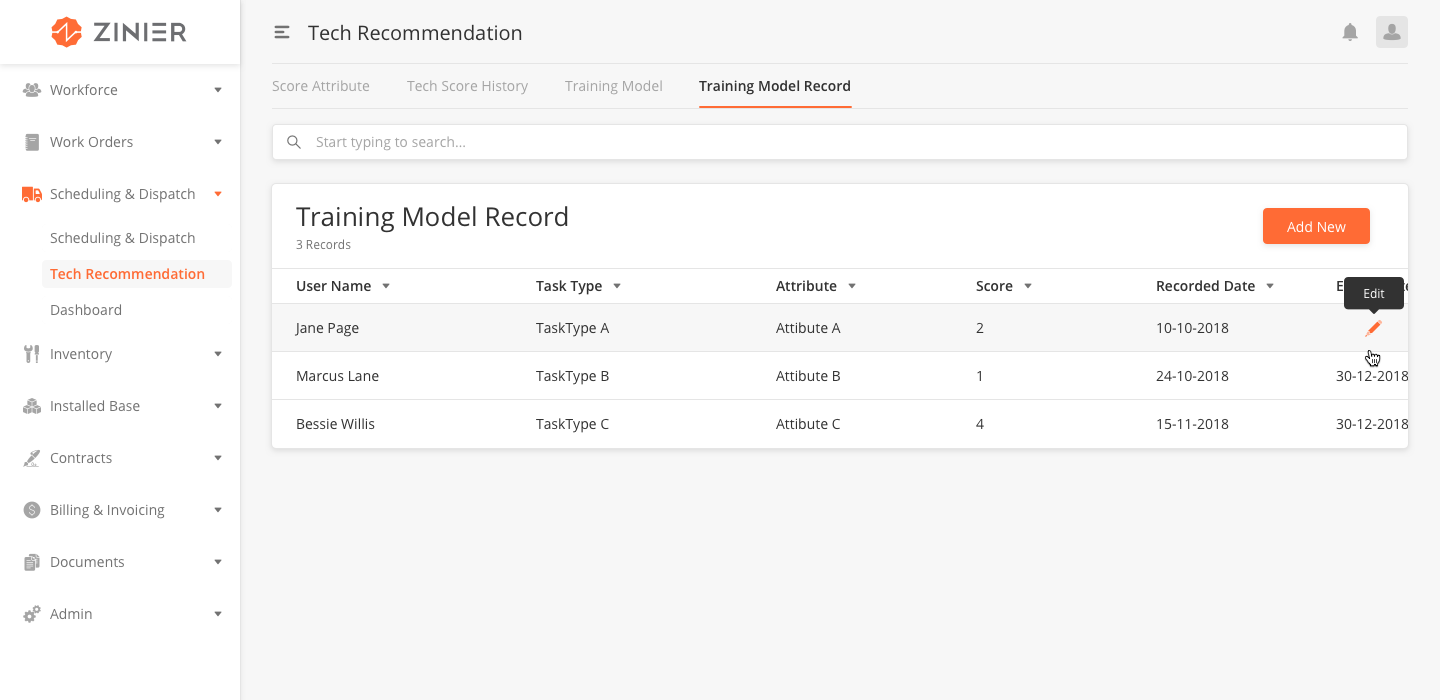
Add a New Training Model Record
-
From the main page, click Add New to open the side panel.
-
Enter the Name and Description of the Training Model Record.
-
Select the Task Type.
-
Select the Attribute.
-
Enter the Recorded Date
-
Enter the Expiry Date
-
Select the User.
-
Click Save.
Edit or Delete Score Training Model Records
You can edit or delete a record by hovering over the row of the desired record from the main page table and click the Edit icon. When you click Edit, the side panel will appear. Edit the information and click Save, or click the trash bin icon on the top navigation to delete the record.
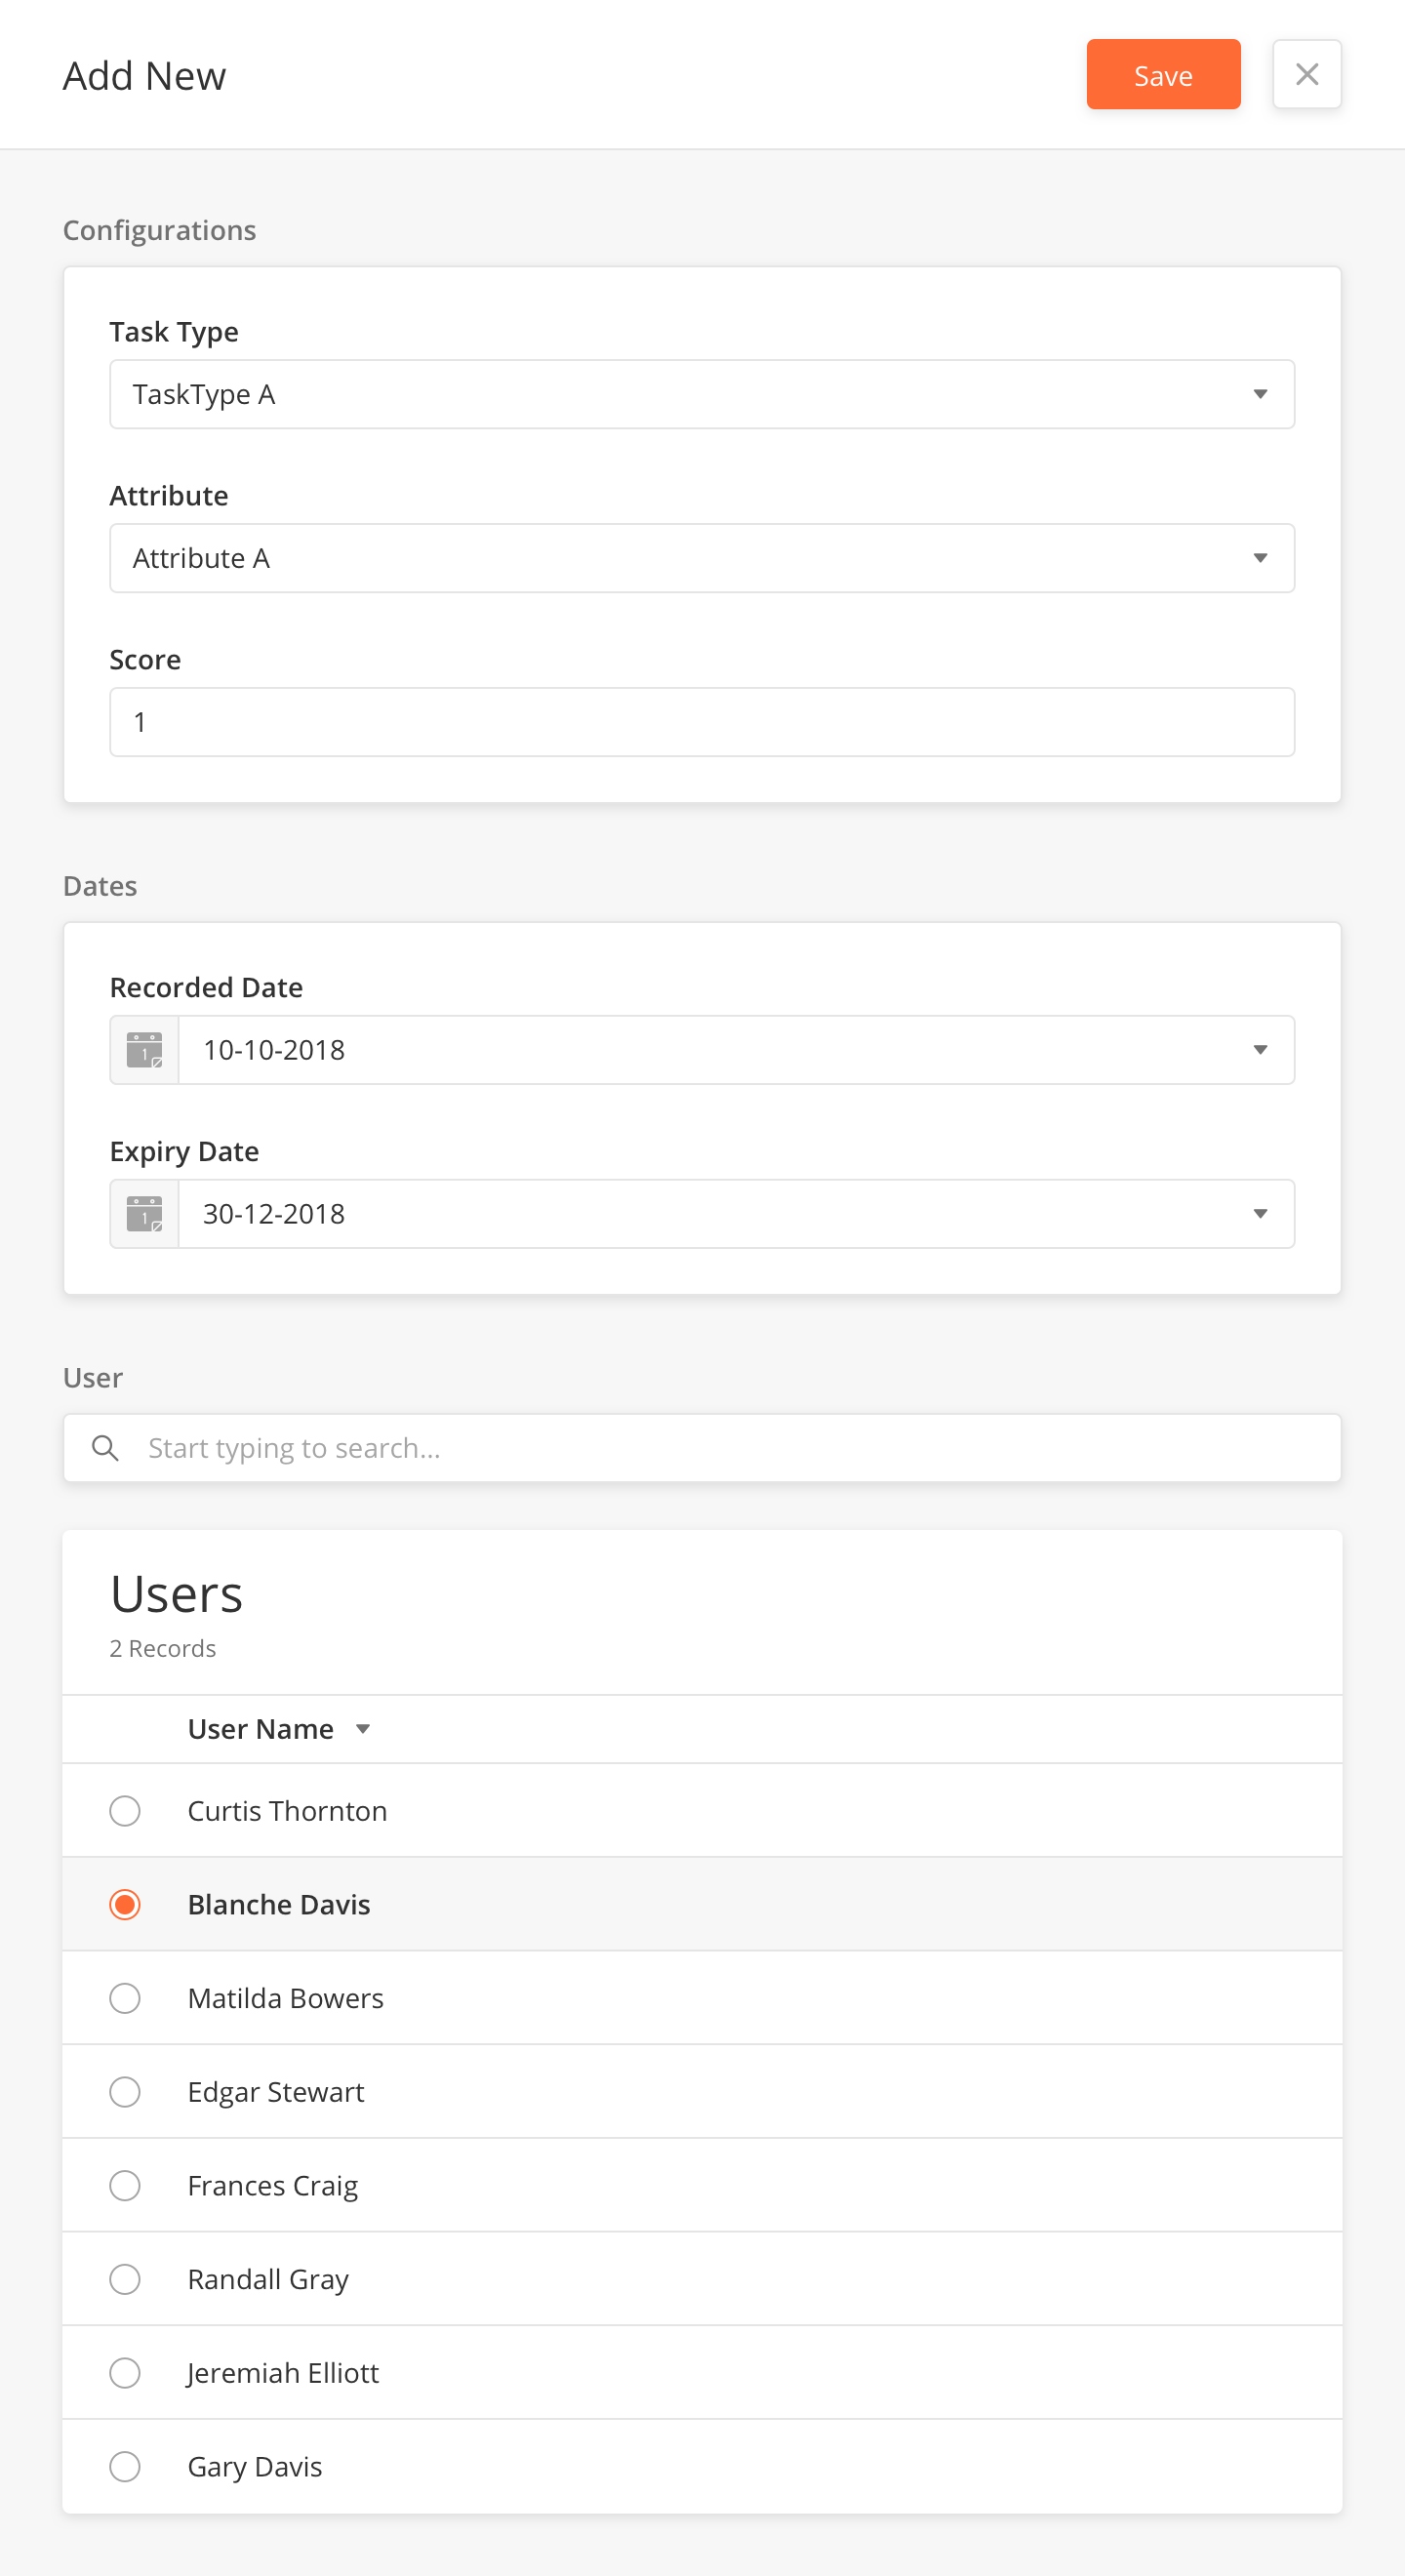
Training Model Record Fields
|
Field Name |
Description |
Example |
|---|---|---|
|
Task Type |
Select the task type for…. |
?? |
|
Attribute |
?? |
?? |
|
Score |
?? |
1 |
|
Recorded Date |
?? |
10-10-2018 |
|
Expiry Date |
?? |
31-12-2018 |
|
Users |
Select a user from the table |
Blanche Davis |