Data models are the backbone of any web or mobile application. They represent a single table of data and are composed of one or more fields -- which represent a column in the table. When “modeling” a new solution or web app, the Models and associated fields first need to be created and organized before you can capture or display any data in your Web or Mobile Application. FSE comes pre-installed with the models and fields for each product, so do be careful when updating them.
But Models don't just exist on their own. They are often "linked" in some manner to other tables in the database. This linking occurs when one table has a foreign key that references the primary key of the other table. These "Model Links" allow relational databases to split and store data in different tables, while linking disparate data items. To define a link or relationship between 2 tables, Zinier uses a concept called Model Links which we will go into more detail on below.
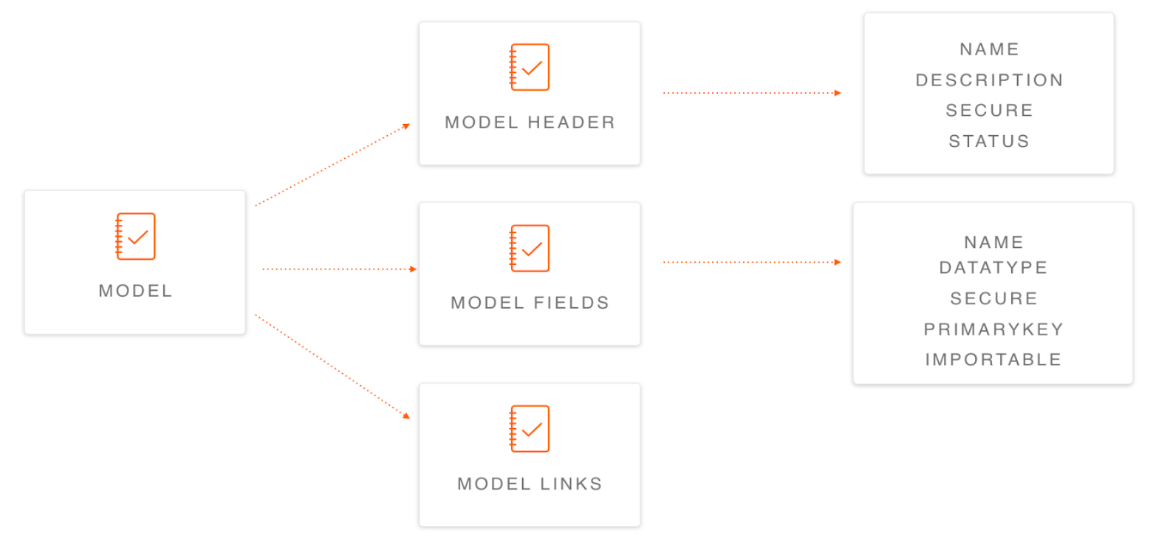
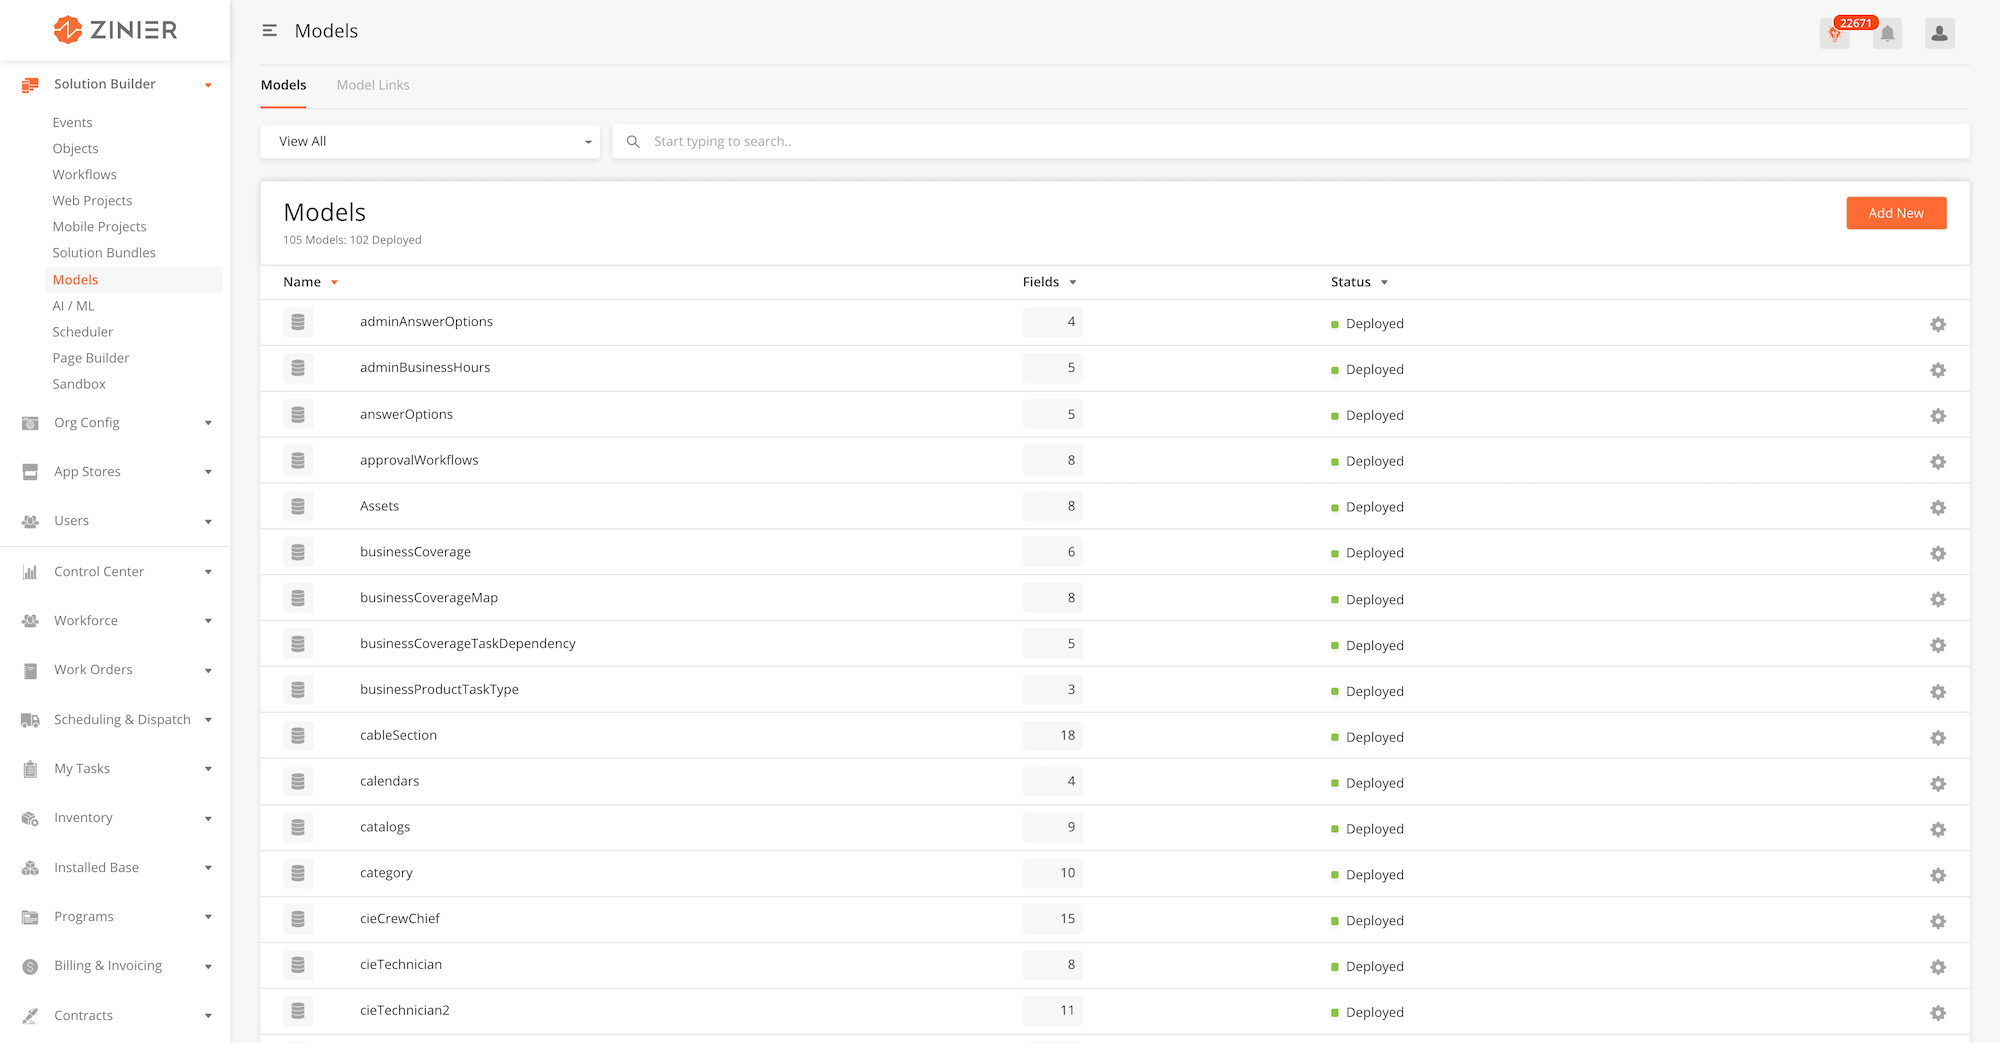
Models and their respective fields are configured by the solution admin from theSolution Builder > Modelsmodule.
-
From the main page, click the Add New button to open the side panel.
-
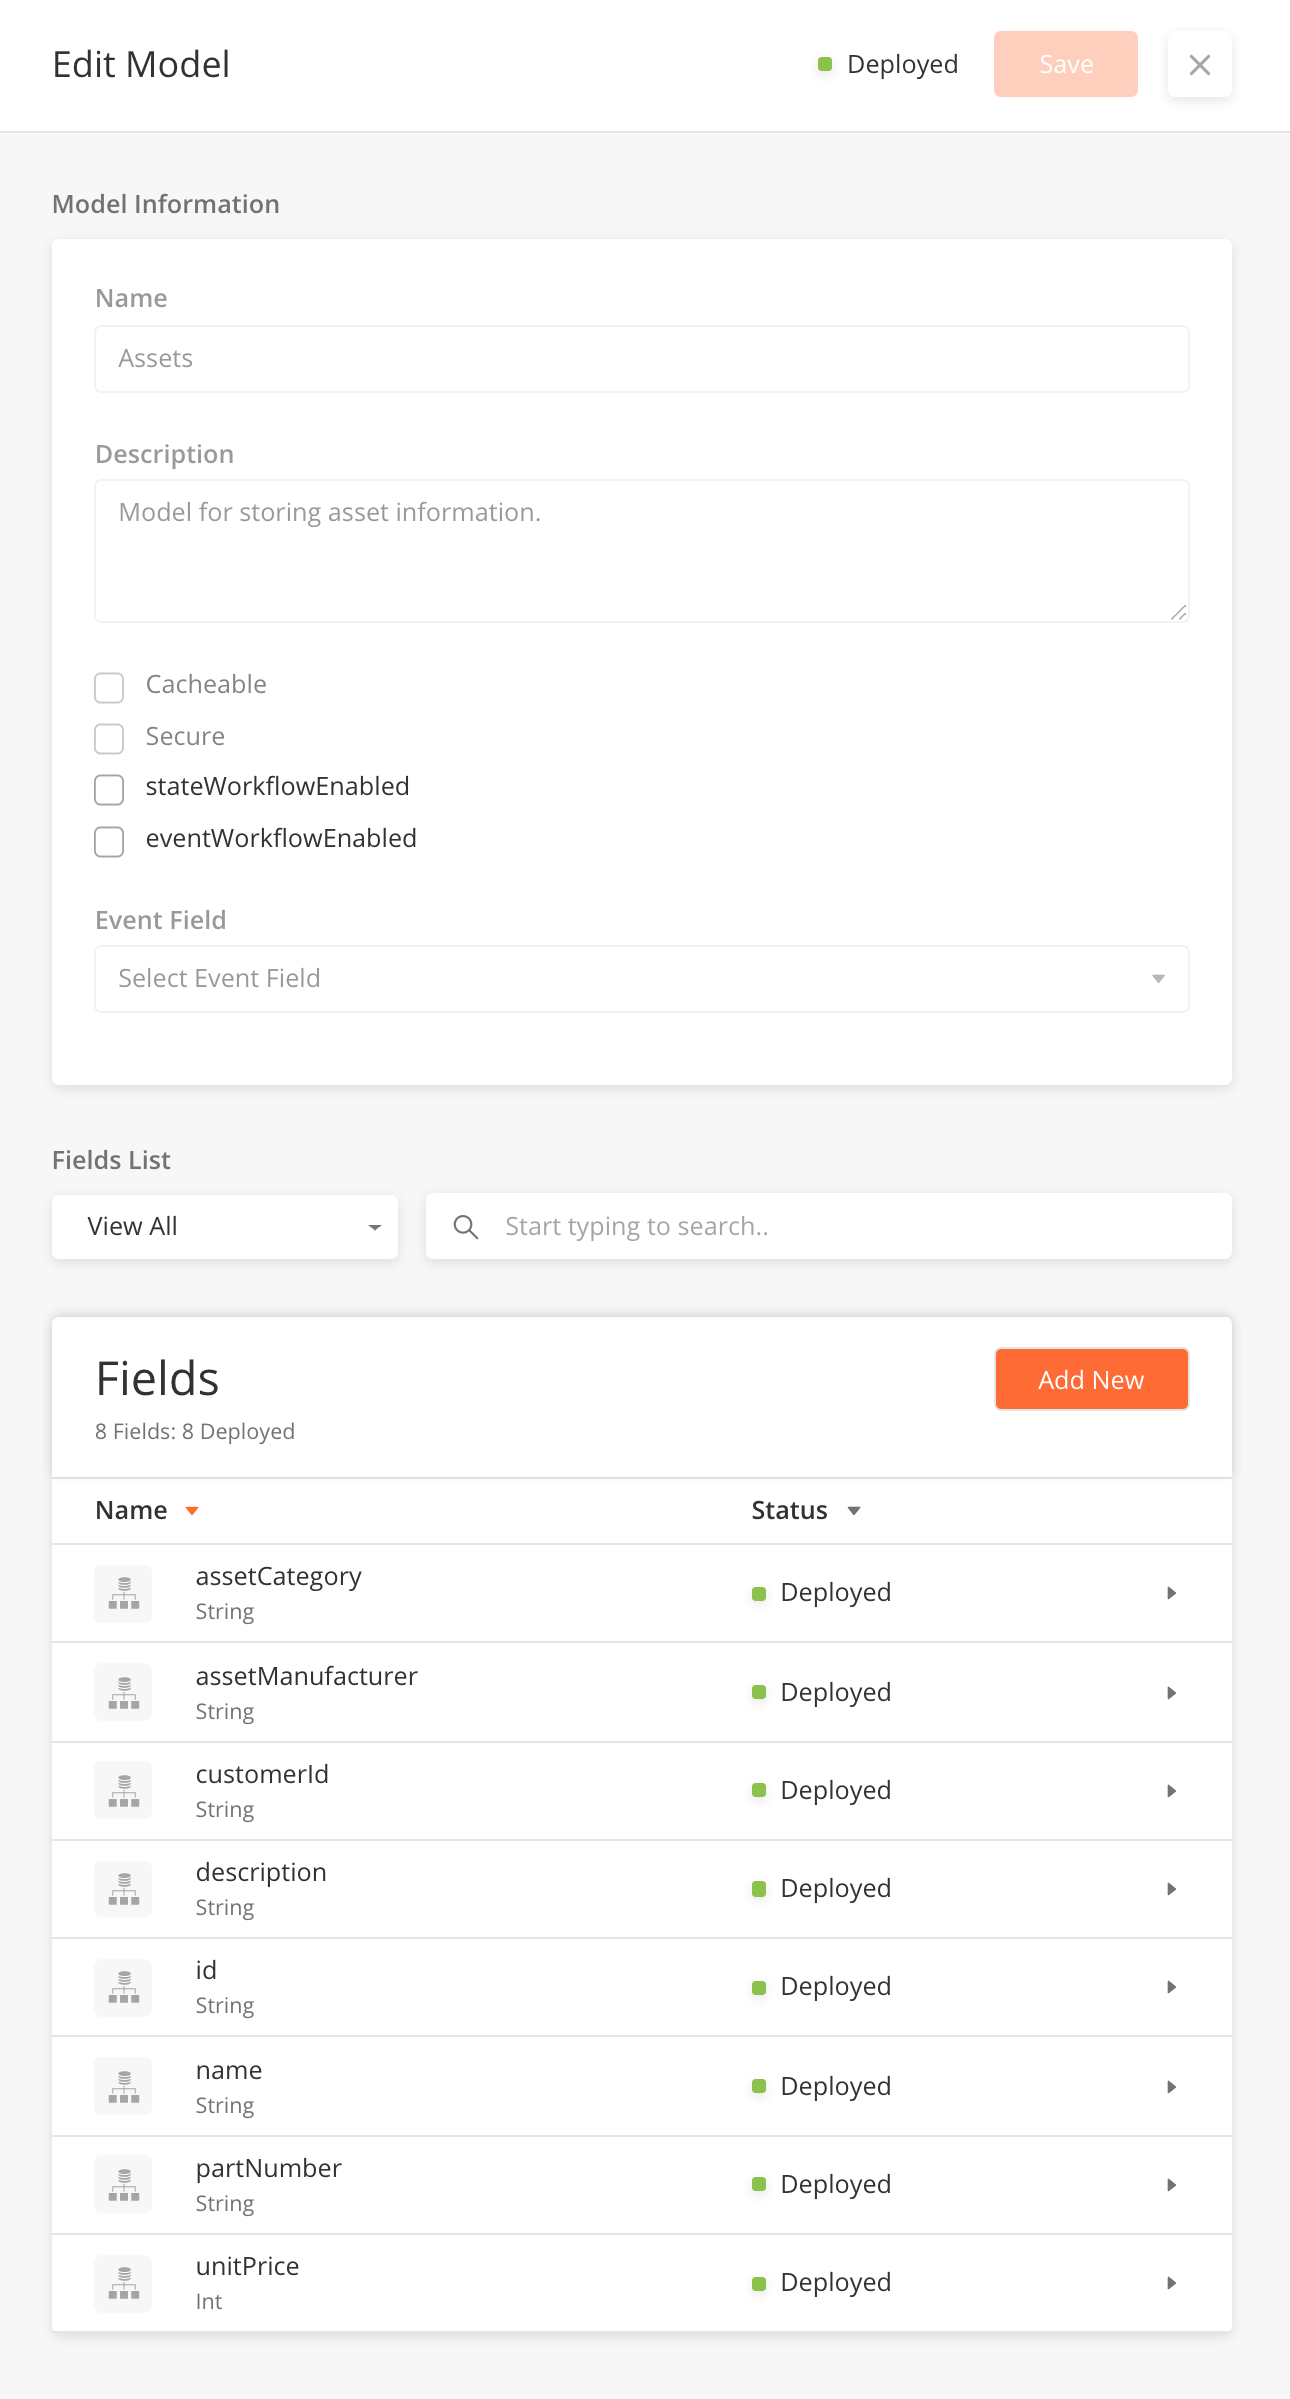
Enter the Name, Description, and other configuration fields associated with the Model. The table below contains a detailed explanation for each field.
-
Click Next to create the Model, which will change the model status to Draft. You are now ready to add your first field to the Model.
-
After adding the desired fields to the model, click the Publish button, which changes the status to Published. Note that you will have to add a field that represents the primary key before you can publish a model.
-
Once you are ready to deploy the published model for use, click the Deploy button.
|
Field Name |
Field Type |
Description |
Example |
|---|---|---|---|
|
Name |
String |
Name of the Model, which be unique |
Assets |
|
Description |
Text input |
A short description to help you remember the purpose of the model. |
Model for storing asset information |
|
Cacheable |
Checkbox |
Specifies if you want to cache the definition of the model in memory |
|
|
Secure |
Checkbox |
Marking a model as secure won’t allow it to be accessed via APIs. |
|
|
stateworkflowenabled |
Checkbox |
If enabled, you will be able to trigger workflows based on the state of a specific field in the model changing (State Events). The most frequent use of State Events is to use them to observe the “Status” field of a Work Order or Task. |
|
|
eventworkflowenabled |
Checkbox |
If enabled, you will be able to trigger workflows based on the state of the model changing (Model Event). Model Events trigger a workflow when there is a change to a specific Model -- i.e. whenever a record is inserted/updated or deleted in a model. For example, you may wish to trigger an integration workflow to an external ERP whenever a new Work Order record is created. |
|
|
Event Field |
Dropdown |
Select the filed in the model for a State Event to monitor for changes as mentioned above. This field will only become active if the stateworkflowenabled = true. |
assetStatus |
-
From the main page, click the Add New button to open the side panel.
-
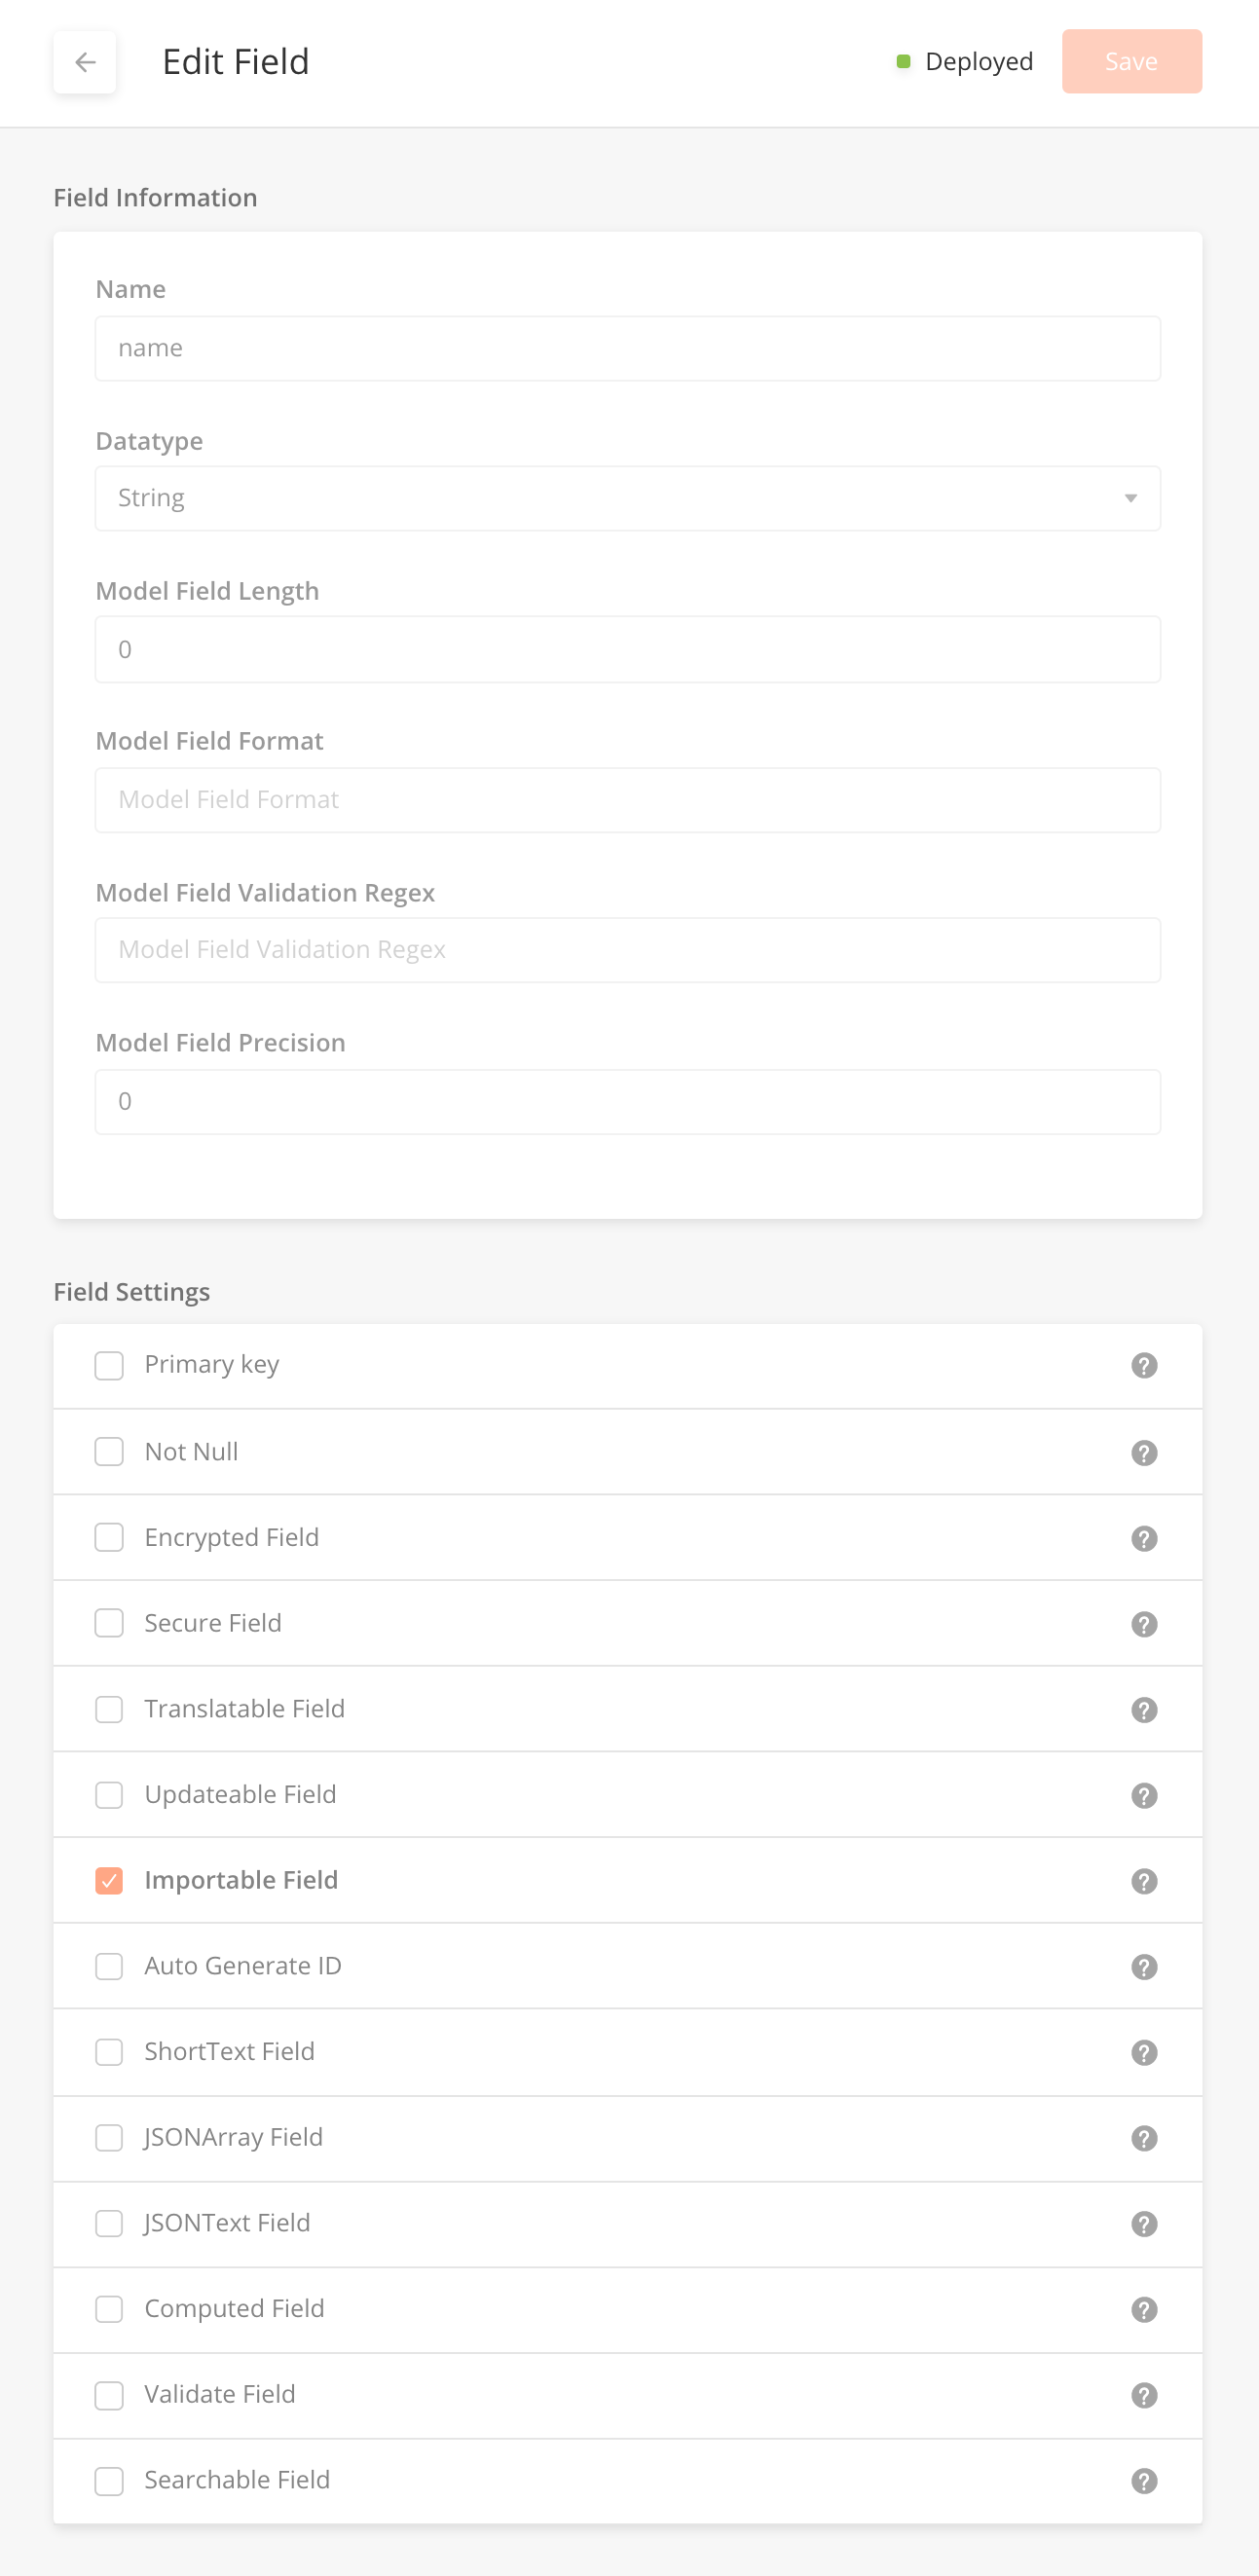
Enter the Name, Datatype, and other configuration fields associated with the Model Field. The table below contains a detailed explanation for each field.
-
Click Save to create the field.
|
Field Name |
Field Type |
Description |
Example |
|---|---|---|---|
|
Name |
String |
Contains the name of the field – aka column for the DB table. |
name |
|
Data Type |
Dropdown |
Defines the datatype of the field. |
string, Datetime, Boolean, Double, Float, Integer, Long, Short |
|
Model Field Length |
Integer |
Defines the maximum number of characters allowed for short string fields. This setting is only editable when Data Type = String and ShortText Field = true. |
12 |
|
Model Field Format |
String |
Defines the desired format for auto generated fields. This setting is only editable when Auto Generate ID = true. |
|
|
Model Field Validation Regex |
String |
Defines the desired regular expression to validate the field. This setting is only editable when Computed Field = true. |
|
|
Model Field Precision |
Integer |
Defines the desired number of decimals for the field. This setting is only editable when Data Type = Double. |
|
Field Name |
Field Type |
Description |
|---|---|---|
|
Primary key |
Boolean |
Specifies whether the field is a primary key or not. |
|
Not Null |
Boolean |
Specifies whether the blank value for this field allowed or not. |
|
Encrypted Field |
Boolean |
Specifies whether the field value needs to be encrypted in the DB. |
|
Secure Field |
Boolean |
Specifies whether the field needs to be filtered in the API response. |
|
Translatable Field |
Boolean |
|
|
Importable Field |
Boolean |
|
|
Auto Generate ID |
Boolean |
Specifies whether the field value needs to be auto-generated. If enabled, you will need to specify the Model Field Format as mentioned above. |
|
ShortText Field |
Boolean |
Specifies whether the field is a Short Text field. This setting is only editable when Data Type = String. If enabled, you will need to specify the Model Field Length as mentioned above. |
|
JSONArray Field |
Boolean |
|
|
JSONText Field |
Boolean |
|
|
Computed Field |
Boolean |
Specifies whether the field is computed. For example, If enabled, you will need to specify the Model Field Validation Regex as mentioned above. |
|
Validate Field |
Boolean |
Specifies whether the field value needs to be validated or not. |
|
Searchable Field |
Boolean |
Specifies whether the field is searchable or not. |
Because models and fields may be in use on the platform already, the platform does not allow you to delete or edit the fields or Models after they have been published. Aside from deleting models and fields, a list of actions that can be performed at each status of deployment is listed below:
|
Status |
Edit the Model |
Add a Field |
Edit a Field |
Delete a Field |
Delete a Model |
|---|---|---|---|---|---|
|
Draft |
Yes |
Yes |
Yes |
No |
No |
|
Published |
You can edit the "stateWorkflowEnabled" or "eventWorkflowEnabled" settings. |
Yes - You will have to "redeploy the model after adding the field. |
No |
No |
No |
|
Deployed |
You can edit the "stateWorkflowEnabled" or "eventWorkflowEnabled" settings. |
Yes - You will have to "redeploy the model after adding the field. |
No |
No |
No |
If you need to edit a field after it has been deployed, the only option is to create a new model.
|
Field Name |
Field Type |
Description |
|---|---|---|
|
Primary key |
Boolean |
Specifies whether the field is a primary key or not. |
|
Not Null |
Boolean |
Specifies whether the blank value for this field allowed or not. |
|
Encrypted Field |
Boolean |
Specifies whether the field value needs to be encrypted in the DB. |
|
Secure Field |
Boolean |
Specifies whether the field needs to be filtered in the API response. |
|
Translatable Field |
Boolean |
|
|
Importable Field |
Boolean |
|
|
Auto Generate ID |
Boolean |
Specifies whether the field value needs to be auto-generated. If enabled, you will need to specify the Model Field Format as mentioned above. |
|
ShortText Field |
Boolean |
Specifies whether the field is a Short Text field. This setting is only editable when Data Type = String. If enabled, you will need to specify the Model Field Length as mentioned above. |
|
JSONArray Field |
Boolean |
|
|
JSONText Field |
Boolean |
|
|
Computed Field |
Boolean |
Specifies whether the field is computed. For example, If enabled, you will need to specify the Model Field Validation Regex as mentioned above. |
|
Validate Field |
Boolean |
Specifies whether the field value needs to be validated or not. |
|
Searchable Field |
Boolean |
Specifies whether the field is searchable or not. |
Overview
Models are often "linked" in some manner to other tables in the database. This linking occurs when one table has a foreign key that references the primary key of the other table. These "Model Links" allow relational databases to split and store data in different tables, while linking disparate data items. To define a link or relationship between 2 tables, Zinier uses a concept called Model Links which we will go into more detail on below.
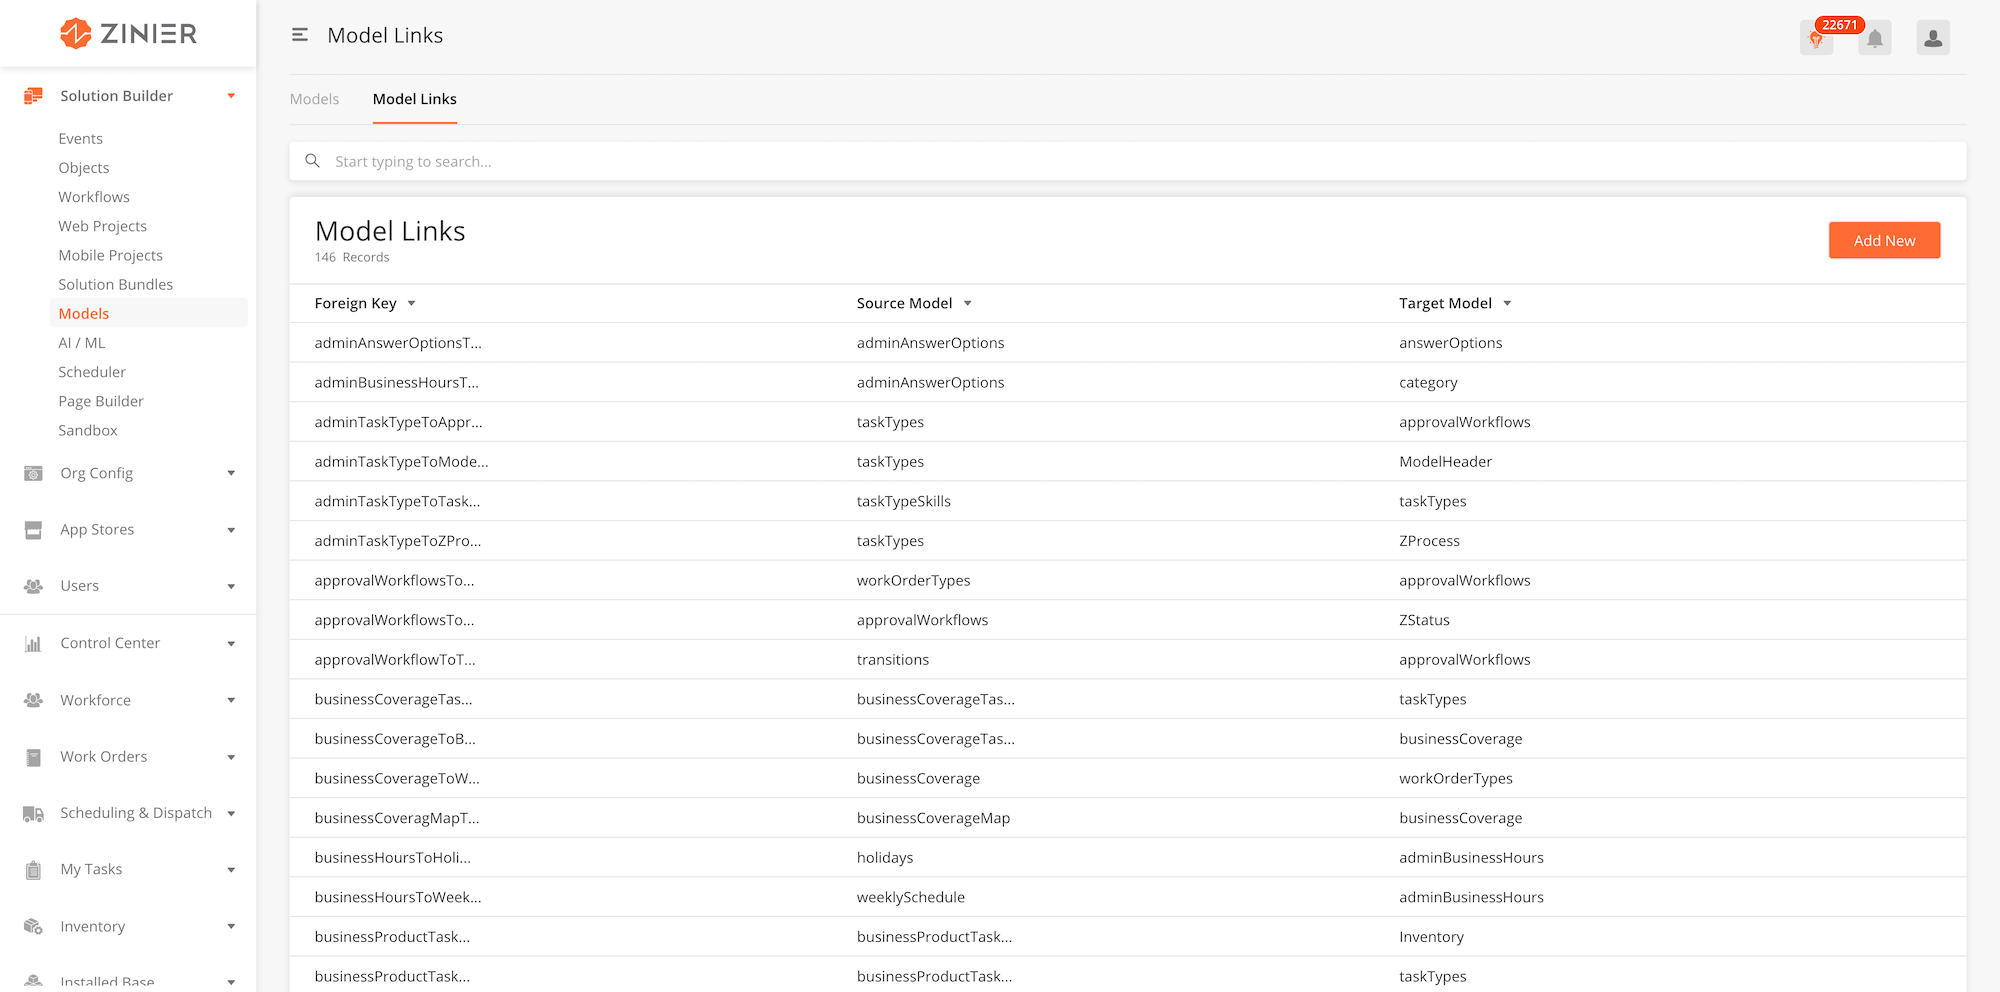
Adding a New Model Link
-
From the main page, click the Add New button to open the side panel.
-
Enter the Foreign Key Name, Source Model Name, and Target Model Name. The table below contains a detailed explanation for each field.
-
Click Save to create the record which will then create a table titled Model Link Fields.
-
Click theAdd Newbutton from the table to bring up the nested side panel and add your Model Link Fields (See Below).
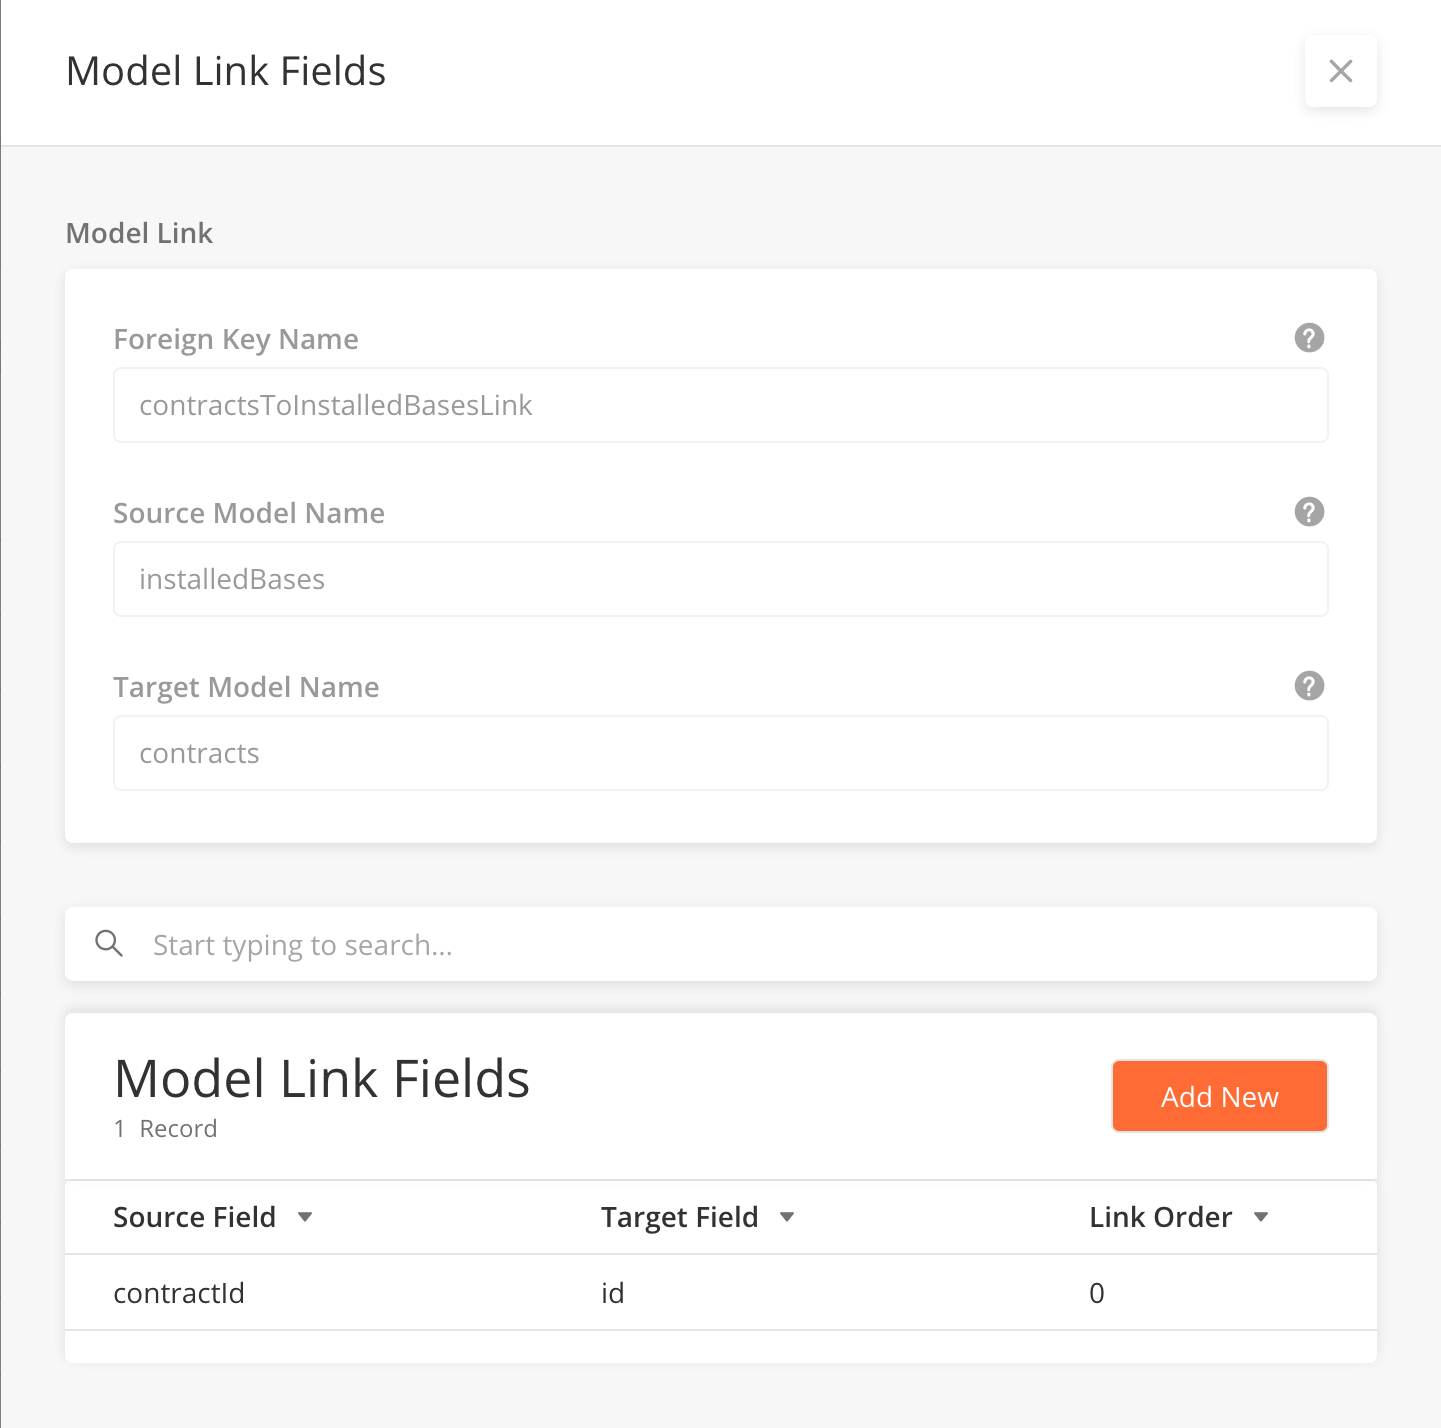
Adding Model Link Fields
-
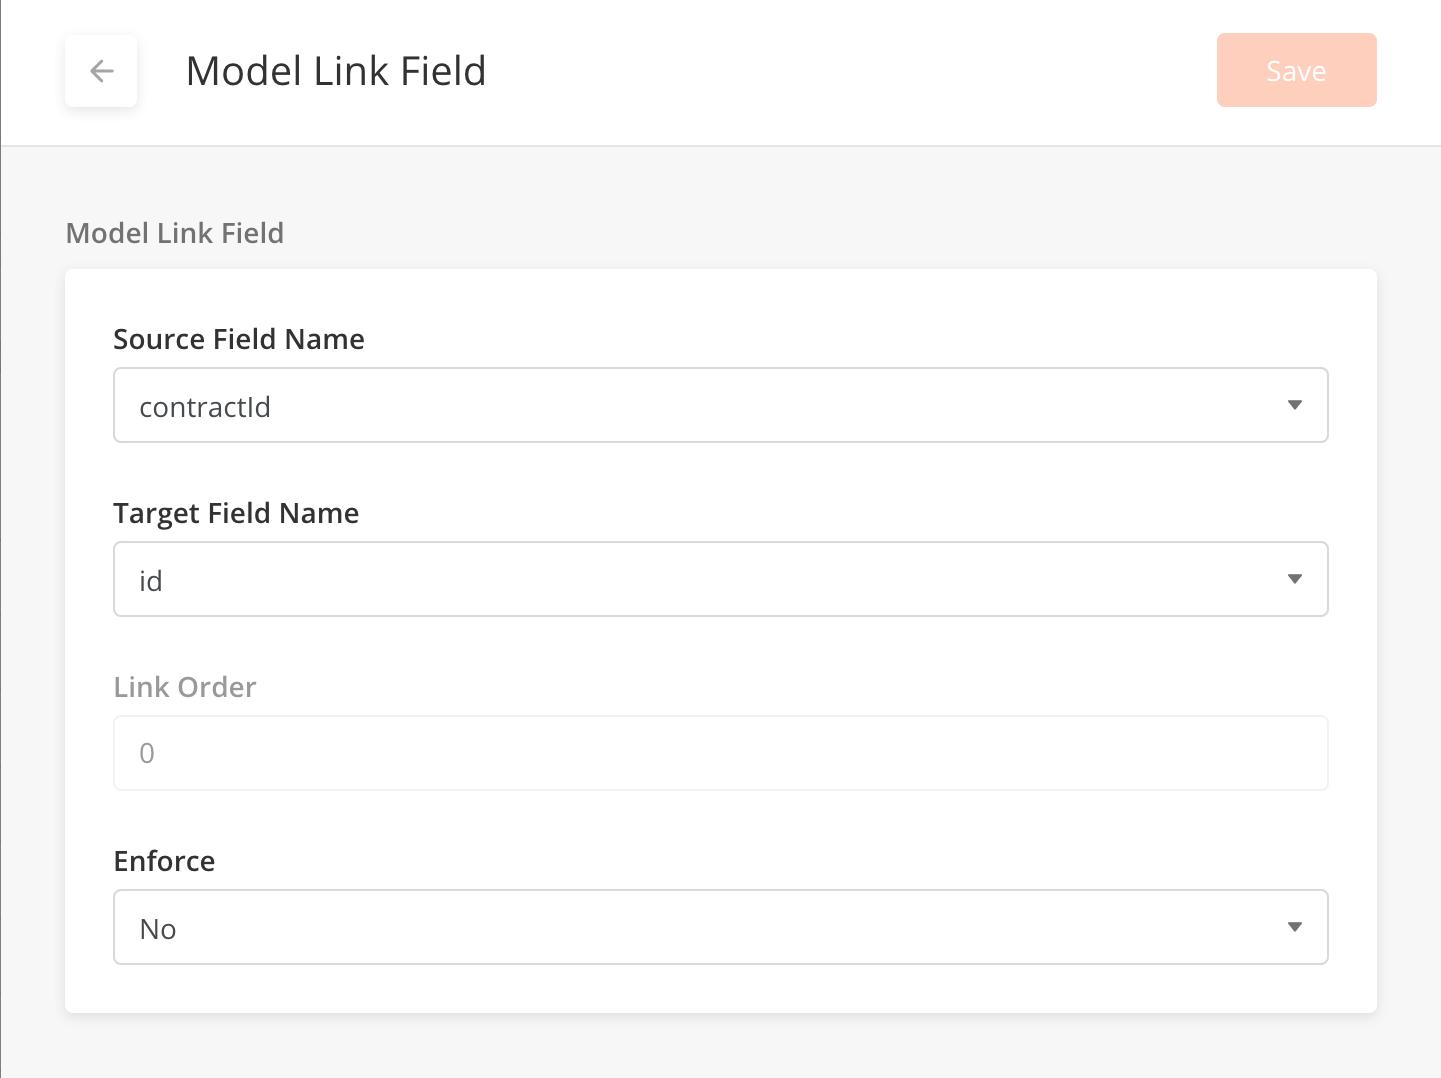
From the Model Link Fields table in the sidepanel, click theAdd Newbutton to bring up the nested side panel.
-
Select the Source Field Name, Target Field Name, Link Order and whether or not to Enforce. The table below contains a detailed explanation for each field.
-
Add as many Model Link Fields as required and then click Save to create the record and close the side panel.
Fields - Model Links
|
Field Name |
Field Type |
Description |
Example |
|---|---|---|---|
|
Foreign Key Name |
String |
A name used to identify the model link. |
contractsToInstalledBasesLink |
|
Source Model Name |
Dropdown |
The name of the model containing the foreign key. This foreign key will be linked to the primary key of the Target Model. |
installedBases |
|
Target Model Name |
Dropdown |
The name of the model containing the primary key. This primary key will be linked to the foreign key of the Source Model. |
contracts |
Fields - Model Links Fields
|
Field Name |
Field Type |
Description |
Example |
|---|---|---|---|
|
Source Field Name |
Dropdown |
The name of the field in the source model you wish to link with the target model. |
contractId |
|
Target Field Name |
Dropdown |
The name of the field in the target model you wish to link with the source model. |
id |
|
Link Order |
Integer |
The order in which the links should appear. |
0 |
|
Enforce |
Dropdown |
No |